


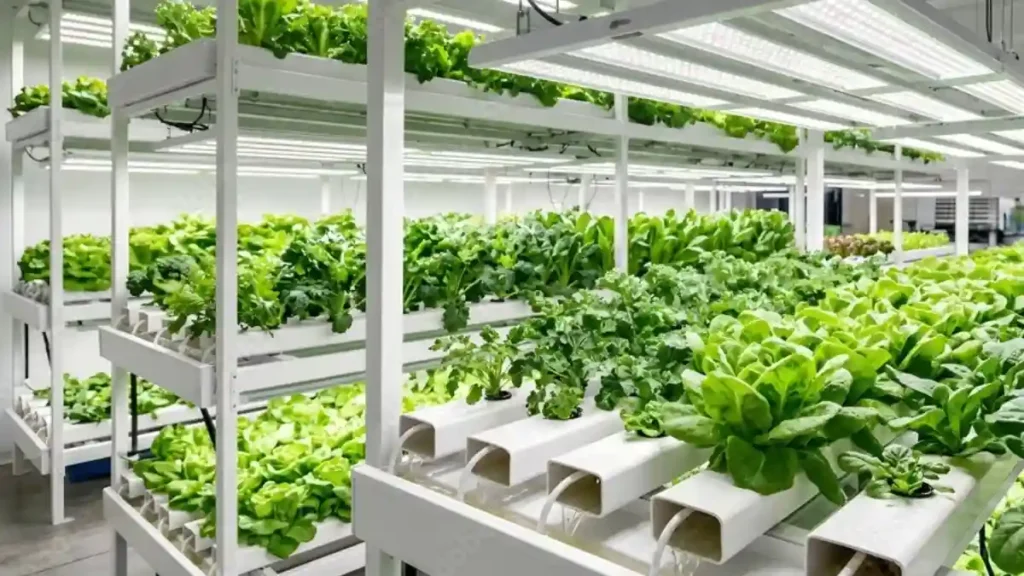
A hydroponic setup lets you grow lettuce, herbs, tomatoes and more in nutrient-rich water instead of soil, and you can build a working one for under $60 in a single weekend. Plants grow up to 30–50% faster, use up to 90% less water than soil gardening, and thrive on a balcony, in a spare room or on a kitchen counter.
If you’ve ever destroyed a basil plant by using too much or too little water, hydroponics will feel like cheating. You control exactly what the roots receive, so there is much less guesswork. This tutorial will lead you through everything: how hydroponics works, the six basic system types, the equipment required, a step-by-step build, fertiliser and lighting requirements, the best crops for novices, and the pitfalls that ruin most first tries.
What is Hydroponic Gardening?
Hydroponic gardening is a way of growing plants in nutrient-rich water rather than traditional garden soil.
Plants require various nutrients to grow, including nitrogen, phosphorus, potassium, calcium, magnesium, and other micronutrients. In conventional gardening, these nutrients are absorbed through the soil. In hydroponics, they are provided by a specially prepared nutrient solution.
The roots absorb dissolved nutrients straight from the water and receive oxygen via the system.
What is a Hydroponic Setup and How Does It Work?
A hydroponic setup is any arrangement that delivers water, dissolved nutrients and oxygen directly to plant roots without soil. The roots sit in or are regularly wetted by a nutrient solution, and a neutral growing medium (or nothing at all) holds the plant upright.
Every system, from a jar on a windowsill to a professional greenhouse, relies on four factors:
- Water and nutrients: A balanced mineral solution substitutes what the soil would typically provide.
- Oxygen: Roots require dissolved oxygen, which is typically delivered by an air pump and air stone, or by draining and refilling the root zone.
- Light sources include sunlight and full-spectrum LED grow lamps.
- Use net pots, clay pebbles, rockwool, or coco coir to keep stems upright.
Because nutrients are already dissolved, roots do not spend energy searching for food. That saved energy goes into leaves, fruit and flowers, which explains the faster growth rates.
Why Build a Hydroponic Setup? 7 Proven Benefits
People switch to hydroponics for practical reasons, not trends. Here is what you actually gain.
1. Faster growth and bigger yields
With constant access to food and oxygen, plants reach harvest size sooner. Lettuce can be ready in 4–5 weeks, compared with 8 or more in soil. Vertical stacking multiplies output per square metre.
2. Up to 90% less water
Instead of emptying, water is recirculated throughout the system. This is important in dry locations and for those watching their utility bills.
3. Year-round growing
Indoors, with grow lights, the seasons stop mattering. You can harvest fresh basil in December as easily as in July.
4. Fewer pests and no weeds
Without soil, you can eliminate most soil-borne diseases, fungus gnats, and weeds. You’ll still keep an eye out for aphids and root rot, but the trouble list is considerably less.
5. Small spaces are enough
A 60 cm shelf, a balcony corner or a countertop can host a productive garden. Apartment dwellers benefit most.
6. Cleaner, fresher food
You harvest minutes before eating, with no soil grit to wash off and no pesticide guesswork when you grow it yourself.
7. A genuinely educational hobby
Measuring pH, tuning nutrients and watching roots develop teaches plant science faster than any textbook. Kids and adults alike get hooked.
6 Types of Hydroponic Systems (And Which One to Choose)
Choosing the right system is the biggest decision in your hydroponic setup. Each design delivers nutrients differently, and each suits different crops, budgets and skill levels.
Deep Water Culture (DWC)
Plant roots hang directly in an aerated nutrient reservoir. An air pump and air stone supply oxygen. DWC is cheap, simple and ideal for lettuce, spinach and herbs. A plastic tub with a lid and net pots is all you need to begin.
Nutrient Film Technique (NFT)
A thin stream of nutrient solution flows continuously along sloped channels, bathing the root tips. NFT is efficient and popular for leafy greens and strawberries, but a pump failure can dry roots within hours, so it needs monitoring.
Ebb and Flow (Flood and Drain)
A tray fills with solution on a timer and then drains back into the reservoir. It can handle larger plants like tomatoes and peppers, and it is forgiving because the medium retains moisture in between floods.
Drip System
A pump delivers solution straight to the base of each plant via miniature emitters. Drip irrigation systems are scalable and suitable for fruiting crops. They require a little extra piping and periodic emitter cleaning.
Wick System
The simplest passive approach is a wick drawing nutrient solution from a reservoir into the growth media. No pump, no electricity. It works well with little herbs but not with thirsty plants.
Aeroponics
The roots hang in the air and are misted with a nutritional solution. Growth is quite rapid, but the system is complex and unforgiving. Treat it as a second-stage project.
| System | Difficulty | Starter cost | Best for |
| Deep Water Culture | Easy | $25–60 | Lettuce, herbs |
| NFT | Medium | $60–150 | Leafy greens, strawberries |
| Ebb and Flow | Medium | $80–200 | Tomatoes, peppers |
| Drip | Medium | $70–180 | Fruiting crops |
| Wick | Very easy | $10–25 | Small herbs |
| Aeroponics | Hard | $150+ | Advanced growers |
Our pick for beginners: start with Deep Water Culture. It has the fewest moving parts, tolerates small mistakes and proves the concept quickly. Costs are approximate and vary by region.
Hydroponic Setup Equipment Checklist and Cost
You do not need a lab. These are the essentials for a beginner DWC or small recirculating system.
Core equipment
- Reservoir: an opaque food-grade tub, 10–20 litres. Light must not reach the water, or algae will bloom.
- Net pots and lid: 5 cm net pots fit most lids for herbs and lettuce.
- Air pump and air stone: keep dissolved oxygen high in DWC.
- Growing medium: clay pebbles (LECA), rockwool cubes or coco coir. Rockwool is the easiest for starting seeds.
- Hydroponic nutrients: a two-part or three-part formula made for hydroponics. Regular garden fertiliser lacks key micronutrients.
- pH test kit or digital pH pen: an inexpensive pen saves a lot of frustration.
- TDS or EC meter: shows how strong the solution is.
- Grow light: a full-spectrum LED if you lack a very sunny window.
- Timer: for lights, and for pumps in flood and drain or drip systems.
Optional upgrades
- Water thermometer, pH up and pH down adjusters, a small fan for airflow, and a reflective grow tent for indoor setups.
How much does a hydroponic setup cost?
| Setup level | Typical cost | What you get |
| Mini (wick or jar) | $10–25 | A few herbs on a windowsill |
| Beginner DWC | $40–90 | 6–8 lettuce or herb plants |
| Mid-range kit | $100–250 | Pre-built tower or NFT with light |
| Advanced indoor | $300+ | Tent, lights, controllers |
Budget tip: buy a nutrient set and a pH pen first. These two items affect results more than any gadget. Prices are rough estimates and change by country and retailer.
How to Build a Hydroponic Setup: Step-by-Step (DWC)
This walkthrough builds a Deep Water Culture system, the most beginner-friendly design. Allow about two hours.
Step 1: Choose the location
Pick a spot near a power outlet, away from drafts and with stable temperatures between 18 and 26 °C. A bright window helps, but a grow light gives more consistent results.
Step 2: Prepare the reservoir
Wash the tub with mild soap and rinse well. If it is translucent, wrap it in black plastic or paint it to block light. Cut holes in the lid to fit your net pots, spacing them about 15–20 cm apart for lettuce.
Step 3: Install aeration
Place the air stone at the bottom of the tub and connect it to the pump with airline tubing. Keep the pump above the water line, or fit a check valve so water cannot siphon back.
Step 4: Start your seeds or seedlings
Sow seeds in rockwool cubes soaked in pH-adjusted water. Keep them warm and humid under a clear dome. Roots should appear in 5–10 days. Alternatively, rinse the soil off store-bought seedlings very gently and transplant them.
Step 5: Mix the nutrient solution
Fill the reservoir with water. Add nutrients exactly as the label directs, usually at half strength for seedlings. Stir well, then test.
Step 6: Adjust the pH
Aim for a pH of 5.5–6.5. Add pH down or pH up a few drops at a time, stirring and retesting after each addition.
Step 7: Place plants and set the light
Set the rockwool cubes in net pots, surround them with clay pebbles and lower them so the cube bottoms just touch the water. Run LED lights 14–16 hours a day, 20–30 cm above leafy greens.
Step 8: Maintain a weekly routine
Check pH and EC every two days at first. Top up with plain water as levels drop, and replace the entire solution every 10–14 days to prevent nutrient imbalance.
Nutrients, pH, Light and Temperature: Get the Numbers Right
Nutrient solution and EC
Use a nutrient formula made for hydroponics, since it contains calcium, magnesium and trace elements that general fertilisers often omit. EC (electrical conductivity) shows total nutrient strength.
Why pH matters
PH controls whether roots can absorb nutrients. Outside 5.5–6.5, iron, calcium and other elements become locked out even though they are present in the water. Test pH often, because it drifts as plants feed.
Lighting
Leafy greens need roughly 14–16 hours of light a day. Full-spectrum white LEDs with a balanced blue and red output work well and run cool. Fruiting plants need stronger light and a longer total energy input. Keep the light close enough to be effective but far enough to avoid leaf burn, and use a timer so the schedule never slips.
Water and air temperature
Keep the nutrient solution between 18 and 22 °C. Warm water holds less oxygen and encourages root rot. In hot climates, place the reservoir in the shade, insulate it, or use a small chiller. Air temperature of 20–26 °C and humidity of 50–70% suit most crops.
Oxygen and airflow
A constantly bubbling air stone is non-negotiable in DWC. A small fan creating gentle air movement strengthens stems and reduces mould in humid rooms.
Best Plants for Your First Hydroponic Setup
Begin with quick, forgiving crops that can tolerate minor errors:
- Lettuce (butterhead, romaine, and loose-leaf): harvest in 4-6 weeks.
- Basil thrives in warm, bright settings and continues to produce when cut.
- Mint and parsley are hardy plants that provide a regular supply.
- Spinach, kale, and bok choy are nutritious greens that thrive in chilly water.
- Strawberries are rewarded in NFT or tower systems if you get confidence.
- Cherry tomatoes and peppers perform best in ebb and flow or drip systems with adequate light and assistance.
8 Common Hydroponic Mistakes and How to Fix Them
1. Ignoring pH
Yellowing leaves despite good nutrients usually mean lockout. Test, adjust and retest.
2. Letting light into the reservoir
Green slime means algae. Use opaque containers and cover every opening.
3. Overfeeding nutrients
Brown, crispy leaf tips point to too high an EC. Dilute with plain water.
4. Warm, stagnant water
Slimy, brown, smelly roots are a sign of root rot. Cool the water, boost aeration and replace the solution.
5. Skipping solution changes
Plants absorb nutrients unevenly, so imbalances build up. Replace the reservoir every 10–14 days.
6. Weak or poorly timed lighting
Long, pale, stretched stems mean the light is too weak or too far away. Lower it or upgrade.
7. Starting too big
Pick one small system and master it before expanding or adding aeroponics.
8. Forgetting a backup plan
In NFT and drip systems, a pump failure can hurt plants quickly. Check daily and keep a spare pump.
Conclusion:
A hydroponic setup is one of the most rewarding ways to grow fresh food, and it is far easier than it looks. Pick a simple Deep Water Culture design, gather the essentials, keep pH between 5.5 and 6.5, and give your plants steady light and aerated water. Within weeks you will be harvesting crisp lettuce and fragrant basil from your own home.
Ready to start? Order your nutrients, a pH pen, and a tub now, and set up your first system this weekend. After you’ve developed your first crop, consider expanding into towers, NFT channels, or fruiting plants. Share your results and queries in the comments below, and sign up for more soil-free growing tips.
Certainly! If you’d like to learn more, please consider following our WhatsApp Channel, Facebook, Instagram, YouTube, Twitter, and Pinterest.
Hydroponic Setup FAQs:
Q1: How much space do I need for a hydroponic setup?
A1: A beginner DWC system fits in about 0.3 square metres, roughly a small shelf or counter. A vertical tower can grow 20 or more plants in a footprint smaller than a dining chair.
Q2: Can I use tap water in a hydroponic setup?
A2: Often yes. Let chlorinated water sit for 24 hours, then test pH and EC. Very hard water may need filtering or a reverse osmosis system because high mineral content throws off your nutrient balance.
Q3: What is a hydroponic setup?
A3: A hydroponic setup is a growing system that allows plants to develop without traditional soil. It uses nutrient-enriched water to provide essential minerals directly to plant roots.