Any flourishing garden must have perennial flowers since they provide long-lasting beauty and a low-maintenance gardening option. Some plants are particularly notable for their capacity to bloom continuously during the growing season, making your garden a vibrant haven from spring to October. Known as “endless summer blooms,” these flowering beauties are not only aesthetically pleasing but also hardy and tolerant of a wide range of soil types and temperatures.
Consider these top perennial flowers that bloom all summer:
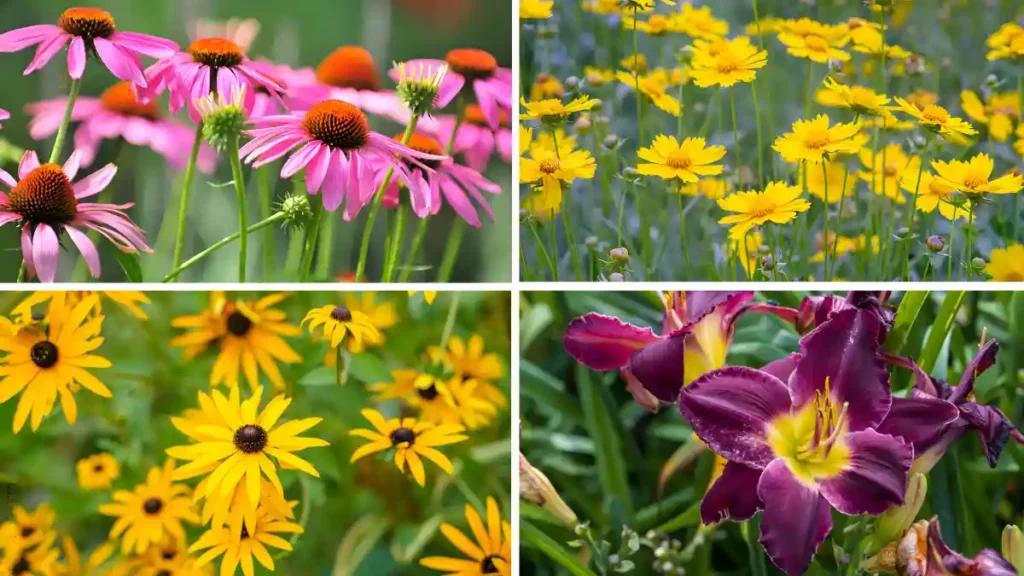
1. Daylilies (Hemerocallis)
Gardeners love daylilies because of their hardiness and abundant blooming. These vibrantly colored blooms grow best in full sun to light shade. Daylilies may bring a pop of color to your garden beds by blooming regularly throughout the summer with the right care.
2. Echinacea (Coneflower)
Coneflowers are an essential component of any perennial garden due to their daisy-like look and therapeutic qualities. They draw pollinators like butterflies and bees and can withstand droughts. Echinacea plants produce a long-lasting display of pink, purple, white, or yellow blooms from early summer until October.
3. Sedum (Stonecrop)
Succulent perennials, or sedums, come in a variety of sizes and forms. They require very little upkeep and can flourish in nutrient-poor soil. From late summer to fall, sedum plants bloom in clusters of star-shaped blooms that give texture to your landscape and draw pollinators.
4.Russian Sage (Perovskia atriplicifolia)
Russian sage is known for its towering spikes of lavender-blue blooms and silvery foliage. This perennial prefers full light and can withstand drought. Its blossoms, which span from mid-summer to early fall, give any garden a sense of refinement and a calming color scheme.
5. Salvia
Not only are salvia plants stunning, but they also draw butterflies and hummingbirds. You may get these perennials in a range of blue, purple, pink, and red hues. They are ideal for providing long-lasting color to your garden because they can withstand heat and bloom abundantly from late spring to early fall.
6. Shasta Daisy (Leucanthemum x superbum)
Shasta daisies are traditional perennials flowers with yellow centers and white petals that have a timeless appearance. They thrive in full light and well-drained soil, and they are simple to cultivate and care for. Shasta daisies provide a constant show of bright flowers from early summer until fall.
7. Coreopsis
Tickseed, or Coreopsis, is prized for its vivid yellow blooms that can brighten any garden. These plants are very simple to grow and care for. They bloom consistently from early summer to late fall, and they grow best in full sun and well-drained soil.
8. Black-eyed Susan (Rudbeckia)
The distinctive dark centers and vivid yellow petals of black-eyed Susans make them iconic. These resilient perennials may thrive in a variety of soil types and are resistant to drought. They produce a visually stunning show that can persist for months from mid-summer to early October.
How to Maximize perennial flowers for endless summer blooms:
- Stagger Bloom Times: To guarantee that there is always something in bloom, select a range of perennials with varying blooming times.
- Deadhead Frequently: Many perennials will continue to bloom if spent flowers are removed.
- Feed and Water: To keep your plants healthy and producing flowers, give them a regular diet of a balanced fertilizer and provide enough water, especially during dry times.
- Mulch: Mulching promotes perennial development and blooming by regulating soil temperature, suppressing weeds, and retaining soil moisture.
Conclusion:
For gardeners wishing to create a lush, colorful garden with little work, these perennial flowers are perfect. Choose types recognized for their perpetual summer blooms, and you’ll be rewarded with an annual feast of color and beauty. Whether you like the delicate charm of Shasta daisies or the vivid hues of daylilies, these perennials will add a touch of elegance to your landscape and bring you unending pleasure all year long.
Certainly! If you’d like to learn more, please consider following our WhatsApp Channel: Harvest Gardening
A frequently asked questions:
Q1: What are some examples of low maintenance perennial flowers that bloom all summer?
A1: Daylilies, coneflowers, and black-eyed Susans are a few low-maintenance perennial flowers that bloom continuously throughout the summer and require little care.
Q2: Do low maintenance perennial flowers need fertilizing?
A2: Despite being minimal maintenance in general, they can benefit from an annual early spring fertilizer application that is balanced to promote growth and blooms.
Q3: What are some popular varieties of blue perennial flowers?
A3: Popular blue perennial flower varieties are Bluebells, Campanula, Salvia, Delphinium, and Veronica.