Author

Avery Smith

Browsing

A group of bacteria known as soft rot bacteria are responsible for the common plant disease known as soft rot; these bacteria mostly infect fruits, vegetables, and ornamental plants. These viruses spread easily by water, insects, or infected objects. This can result in large-scale agricultural losses, so both farmers and gardeners should be concerned about the damage it causes. They do best in warm, humid conditions. Quickly avoid soft rot disease by following this guide.

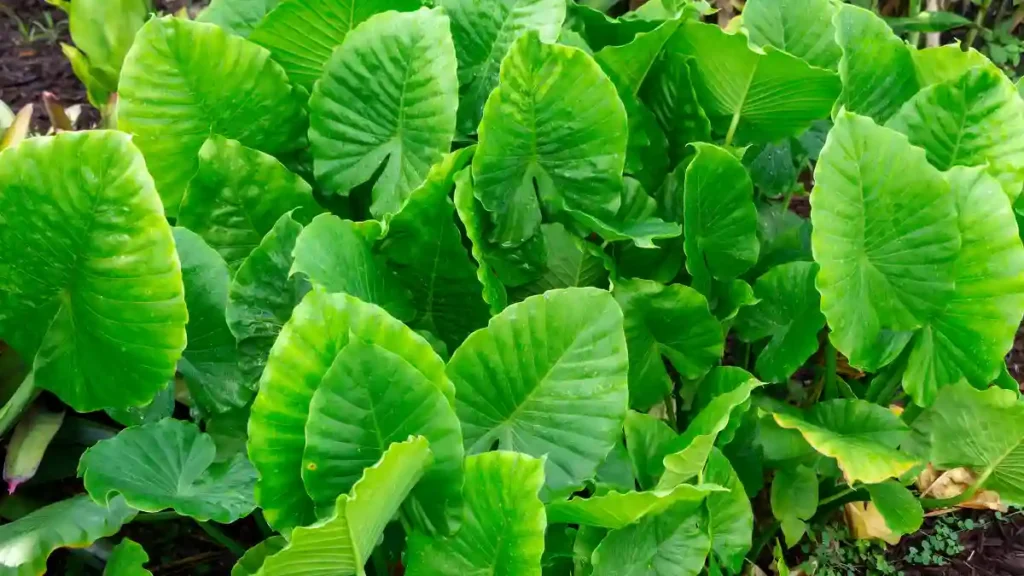
A variety of crops, including vegetables like potatoes, carrots, and cucumbers, are susceptible to the bacterial plant disease known as soft rot. These are the common signs and symptoms of soft rot.

Soft rot disease in plants:

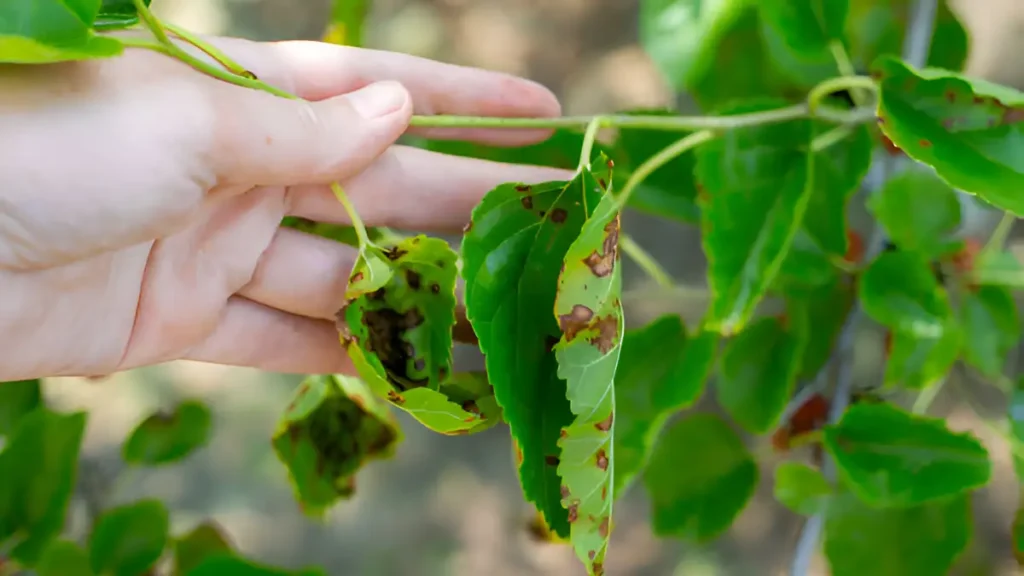
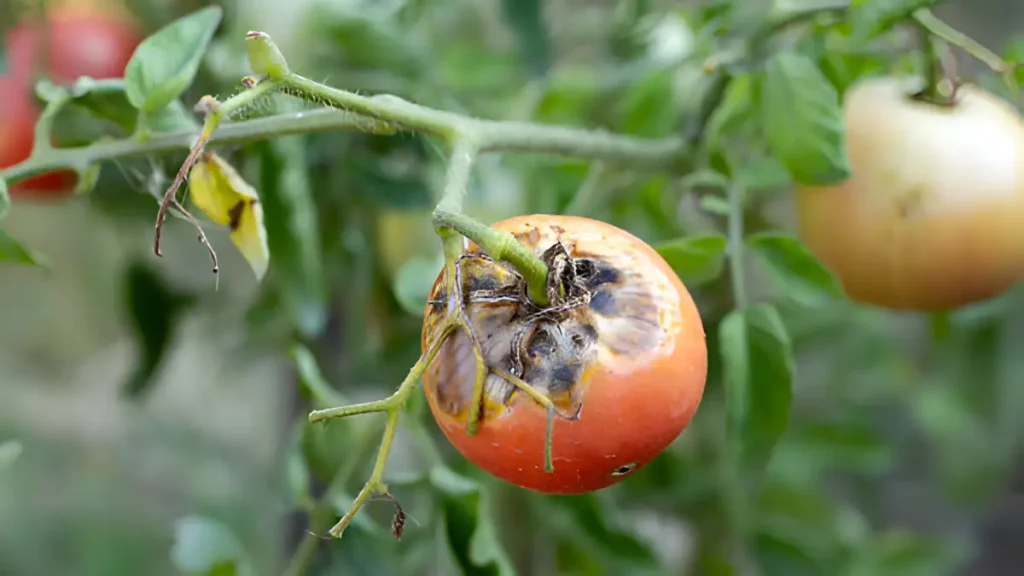
  • Plants lose their structural integrity as a result of soft rot bacteria breaking down the pectate molecules that keep plant cells connected. Wet, squishy patches on the plant tissue are frequently the initial symptom. In time, these areas grow larger, becoming softer and more hollow.  
  • The pigmented discoloration under the spots can range from cream to black, causing the inside tissues to become mushy. The bacteria frequently produce odors during the breakdown of plant tissue. The afflicted tissue may collapse readily when touched because it becomes mushy and soft. 
  • Certain types of extreme weather, such as hail and insects, as well as natural openings, might allow these bacteria to get inside plants. The disease spreads quickly in damp environments, causing significant harm quickly. If the infection is serious enough, you could occasionally see a moist discharge coming from the affected area. 

A combination of cultural customs, good hygiene, and occasionally chemical restrictions are needed to prevent this disease. These are some essential tactics.

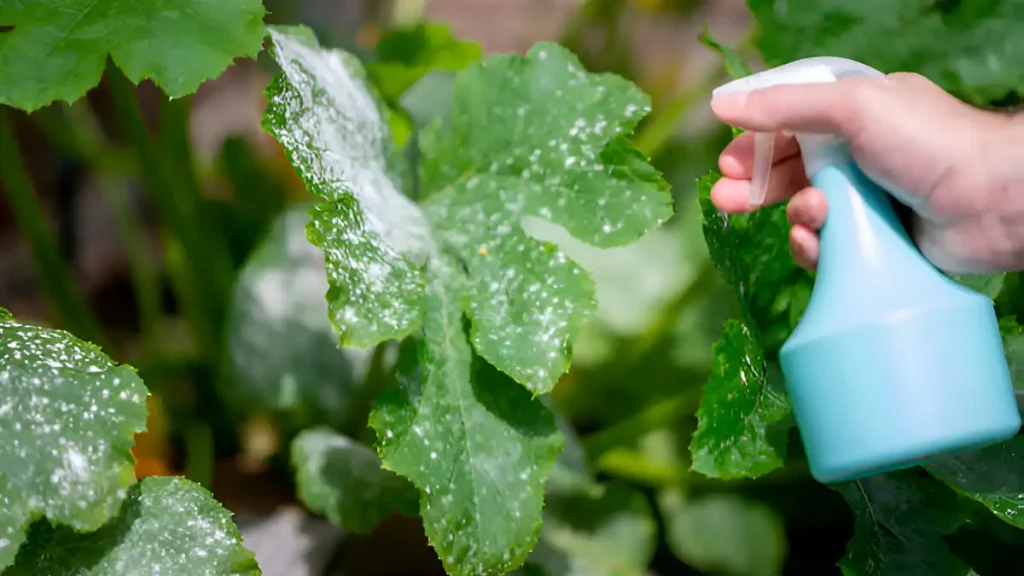
Treatment for bacterial soft rot disease:

  • In addition to avoiding overwatering and making sure your soil drains properly, choose cultivars that are resistant to bacteria. Don’t plant vulnerable crops in the same spot every year. A lot of soft rot infections can be avoided with these easy steps.
  • To stop the spread of bacteria, remove any plants exhibiting soft rot right away and frequently clean the garden. In warm, humid environments, bacterial soft rot flourishes. It is possible to stop outbreaks by controlling greenhouse or field conditions to minimize too much heat and moisture.
  • To promote enough air circulation and lower the humidity surrounding plants, plant spacing should be observed. Working with clean equipment is a must. Harvest crops gently to avoid damage that could become entry points for bacteria.
  • Always inspect plants for early indications of soft rot so that, if it occurs, you can intervene quickly. Bactericides may be utilized in some situations, but they must be used following the label.  Maintaining appropriate greenhouse protocols is crucial in preventing soft rot bacteria and other illnesses associated with moisture.
  • When weeding and harvesting, take care not to damage the vegetables. Decontaminate garden equipment before and after use by treating them with 10% bleach for at least 30 seconds, or better yet, 70% alcohol, if you want to get rid of dangerous plants from the garden. Constant cleaning and sterilizing will lessen illnesses and stop the spread of bacteria.

In conclusion, the degradation of plant tissues, including fruits, vegetables, and tubers, is predominantly caused by a group of diseases known as soft rot disease. Warm, humid weather encourages the growth and spread of bacteria, making soft rot illnesses particularly difficult. Reducing the spread of these bacteria requires the implementation of control measures such as appropriate sanitation and the use of resistant plant cultivars. 

Certainly! If you’d like to learn more, please consider following our WhatsApp Channel: Harvest Gardening

Q1. What is bacterial soft rot?

A1. Succulent plant components, including fruit, stems, and bulbs, are harmed by soft rot bacteria. The chemicals that hold plant cells together are harmed, which eventually leads to the plants falling apart.

Q2. How to remove from bacterial soft rot jade plant?

A2. To stop the illness from spreading, remove and dispose of the afflicted plant parts right away. Maintain adequate drainage, refrain from overwatering, and locate the plant in an area with enough ventilation.

Q3. How to Remove bacterial soft rot from carrots? 

A3. Carrots can be kept in a dry, cold environment and cleaned thoroughly to help prevent bacterial soft rot. The first step in preventing the disease from spreading is to remove and destroy any infected carrots with care. 

Q4. What kills soft rot bacteria instantly?

A4. Applying high heat directly to the infected region or using a bactericide specifically made for the bacteria are two quick ways to eliminate soft rot germs.

Q5. What are the symptoms of potato soft rot disease?

A5. A soft, mushy texture, a wet appearance, and an unpleasant smell are some of the symptoms. Usually, the rot begins where the potato has natural apertures or wounds.

The term “leaf spot disease” describes a class of plant illnesses that are defined by the development of spots on the leaves. Different bacterial, viral, or fungal infections usually bring on these diseases. These patches can differ in size and shape, and as the disease progresses, they may turn brown, black, or yellow. Early spring is a chilly, damp time of year when leaf spots on plants are most likely to appear. This article will provide some guidance on leaf spot diseases, their causes, and treatment methods. 

A typical plant issue that several sources can bring on is leaf spots. Here are specifics regarding the origins of spots and how to recognize them.

Leaf spot disease:

  • While bacteria or other pathogens can also cause leaf spot disorders, fungi are the primary cause of most illnesses. Typically, fungus leaf spots manifest as tiny, spherical, black blemishes. Since the lower and inner branches have more humidity and darkened leaves, this is typically where leaf spot illnesses are first noticed.
  • Leaf spots are a result of bacterial pathogens like Xanthomonas and Pseudomonas. Often seeming water-soaked, bacterial leaf patches eventually turn dark brown or black as they dry. The angular, rounded, raised, buried, and fringed margins of leaf spots are all possible.
  • Tobacco mosaic virus, for example, can cause leaf patches. Viral spots frequently have a strange shape. Signs of the disease, such as fungal spores or spore-producing structures, can be seen in the center of bigger leaf patches.
  • As they consume plant tissues, pests like thrips and aphids can leave marks on plants. The pathogens that produce leaf spots are blown by the wind, splashed by rain, or irrigated leaves, causing spots to appear randomly on their surface. Spots formed by insects frequently have additional indicators of pest activity. 

Leaf spot disease must be properly cared for and, if required, treated with chemicals. Below are a few of his directives.

Leaf spot disease treatment:

  • Determine the disease’s cause first. Remove and dispose of impacted foliage to stop the illness from spreading. To prevent leaf spot infections from spreading, keep leaves as dry as possible. These diseases need moisture to thrive. After trimming, use a disinfectant to clean gardening tools and stop the disease from spreading.
  • In particular, during the dry summer months, water your tree frequently during the growing season to keep the top 6 to 8 inches of soil damp. Keep the mulch layer surrounding your tree 3 to 4 inches deep. Clean any fallen leaves from the spaces surrounding trees and bushes, especially in the fall. To keep leaves dry, remove any branches that are severely affected and refrain from watering from above.
  • Use a suitable fungicide if the illness is fungal. Typical choices are neem oil, chlorothalonil, or fungicides with a copper base. Observe the dosage and frequency instructions on the label. Additionally, a neem oil spray can help prevent leaf spots after all afflicted areas have been removed.
  • Until a soil test indicates that fertilizing is necessary to address a nutrient deficiency, do not treat trees and shrubs that have leaf spot diseases. Balanced fertilization can help plants stay healthy by strengthening their defenses against disease. Keep an eye out for any new infection-related symptoms in your plants and repeat therapy as needed.
  • Large trees require high-pressure spraying equipment to completely cover their canopy. Fertilize your plants in a balanced way to keep them healthy and potentially resistant to disease. For large trees, treating leaf spot disease may require hiring a qualified arborist.

Leaf spot disease is a prevalent plant disease that can be brought on by several pathogens, such as bacteria, fungi, and occasionally viruses. Small, discolored spots on leaves are usually how they show up, and this might cause early leaf drop. The reduction of leaf spot disease’s negative effects on plants depends on routine observation and prompt action. You may manage and avoid leaf spot disease in your plants by following the above-mentioned strategies.

Certainly! If you’d like to learn more, please consider following our WhatsApp Channel: Harvest Gardening

Q1. What is leaf spot disease?

A1. Plant leaves with brown spots on them are a sign of Leaf Spot Disease, a fungal or bacterial illness. Based on the pathogen in question, these spots may differ in size, shape, and color.

Q2. What is the method for bacterial leaf spot treatment?

A2. To prevent infection spread, remove and destroy diseased leaves, apply copper-based fungicides every seven to ten days, and choose plant cultivars resistant to disease.

Q3. What are ash leaf spots? 

A3. Ash leaf spots are circular or irregular patches that form on the leaves of ash trees. They are frequently caused by fungal diseases or environmental stress. If severe, they usually have a bright or dark core and might result in leaf drop.

Q4. How to treat leaf spot disease on houseplants?

A4. Treat leaf spot disease by removing affected leaves, increasing air circulation, and not watering plants from above. If necessary, apply a fungicide to prevent spread.

Q5. What causes leaf spot disease in Pothos plants?

A5. Bacterial infections or fungal diseases such as Phyllosticta are the main causes of leaf spot disease in Pothos. Poor ventilation and overwatering may have a role in its development.

Many plants, including ornamental plants, fruits, vegetables, and flowers, are susceptible to the common fungal disease known as powdery mildew. The surface of the plant is covered in a white or gray powder. Numerous fungal species, most frequently those belonging to the Erysiphaceae family, are the cause of it. In addition to reduced output, the disease may cause stunted growth and leaf yellowing. Before using fungicides, a lot of individuals try home remedies for powdery mildew. Read this article to learn how to treat it using natural, homemade products. 

One of the most prevalent diseases that affect plants is powdery mildew. Fortunately, the condition may be fought with the use of efficient powdery mildew remedies.

Powdery mildew on plants:

  • Although powdery mildew fungi are ubiquitous, they do prefer high relative humidity during the night. Spots on the foliage’s surface usually appear on the undersides of leaves, they are the most conspicuous indications of powdery mildew. Infected leaves will prematurely drop from the plant if a sufficient portion of the leaf surface is covered in powdery mildew, which will hinder photosynthesis.
  •  Powdery mildew can steal vital nutrients from plants, causing leaves to dry out and turn yellow. They can also be carried to your plants by wind, insects, and water splashing, where they overwinter in plant detritus. 

Many different plants are susceptible to powdery mildew, a common fungal disease. Thankfully, home remedies are often effective in managing it. These are a few efficient techniques.

How to get rid of powdery mildew:

Eliminate Affected Areas

  • First, trim back or remove any areas of your plants where powdery mildew is evident. Composting them could facilitate the spread of the spores, so avoid doing so. Use fungicides designed to precisely treat powdery mildew on plants to eradicate it from them.

Spread Milk

  • Powdery mildew can be treated and prevented with milk. Prepare a spray bottle mixture of 40/60 milk to water and use it to mist your plants. Every seven to fourteen days, reapply the fungicide as directed on the label.

Method of Baking Soda

  • The spread of powdery mildew can be inhibited by using baking soda. Spray the damaged plants once a week with a solution made of baking soda, soap, and water. Baking soda aids in increasing the leaf surface’s pH. 

Vinegar Mist

  • The acetic acid in vinegar, which kills fungi, allows it to function as a fungicide. To produce a spray mixture, combine one gallon of water and four tablespoons of vinegar. Apply the liquid to the plants every few days. Vinegar’s acetic acid can help prevent mildew from growing.

Organic Powdery Mildew Remover

  • One natural treatment for powdery mildew is to thoroughly spray plants with diluted hydrogen peroxide solutions once a week. It is always better to remove powdery mildew naturally rather than harming your plants with harsh chemicals. Maintaining the right moisture content without overly increasing the humidity around the plants is the best natural defense against powdery mildew. 

Prevention of powdery mildew

  • Invest in types resistant to powdery mildew and select robust plants. Prune every plant in your yard so that it feels as though it has enough space to breathe since this will improve air circulation. Till the powdery mildew epidemic is under control, do not fertilize the impacted plants. Refrain from watering the plant from above, as damp leaves may promote further growth retardation.

In conclusion, many different types of plants are susceptible to powdery mildew, a common fungal disease that can weaken plants but is usually not lethal. Preventing severe infestations and maintaining the health of impacted plants need early diagnosis and swift action. Following the above guidelines can help you successfully treat powdery mildew at home.

Certainly! If you’d like to learn more, please consider following our WhatsApp Channel: Harvest Gardening

Q1. What kills powdery mildew instantly?

A1. Potassium bicarbonate is the most effective remedy for powdery mildew.

Q2. How to treat powdery mildew on roses?

A2. On the stems, buds, and leaves of roses, powdery mildew shows as a white or gray powdery material. The product label specifies that fungicide should be administered every 7–14 days during the growing season to eliminate diseased leaves.

Q3. How to get rid of powdery mildew on houseplants?

A3. To stop powdery mildew, don’t overwater the plants, and keep them in sunlight. One way to treat powdery mildew is to combine baking soda with a few drops of dish soap. Isolate diseased plants to keep powdery mildew from spreading to other houseplants.

The month of August marks a shift in the garden, as the warmth of summer blends with the first whispers of autumn. Your garden will be inundated with color, texture, and movement in August, but you can make preemptive efforts this month to improve next year’s displays. In August, too, you can plant perennials that will take root before winter and come back stronger the following year. Flowers to plant in August are covered in this article.

As part of a summer gardening checklist, hardy annual flowers can be sown indoors or outside in August. This guide explains what to plant in August to create a lovely flower and how to do so.

Planting flowers in August:

Marigold

Native to the Mediterranean region, is a cheerful and adaptable flower. The greatest flower to plant in August is this one.

  • Pick a location that receives at least 6 to 8 hours of sunlight each day. Well-drained soil that is somewhat fertile is ideal for marigold growth. Start seeds indoors 6–8 weeks in advance, or sow them straight into the garden. Plant seeds 1/4 inch deep, and keep the soil damp until they sprout. 
  • African marigolds grow taller and require 10-12 inch spacing for young plants. Regular deadheading can encourage more blooms by removing fading blossoms.
  • Avoid watering marigolds from above; instead, let the soil dry out a little bit between waterings. When it is growing, avoid fertilizing them. Excessive nitrogen intake promotes lush foliage at the expense of floral buds.

Calendula

Calendula is usually linked to a warm demeanor. It might be claimed that August is the ideal month to plant.

  • Finding the ideal spot requires making sure it receives at least 4-6 hours of sunlight each day. It requires soil that is abundant in organic matter and well-drained. To promote improved airflow, plant calendula with a spacing of 8 to 12 inches between plants and 18 inches between rows.
  • When planting, soil temperatures should be roughly sixty degrees Fahrenheit. Until the plants take root, water them often. keep the soil damp. It can be necessary to treat marginal soils using a balanced but overfeeding might cause the plants to become spindly and lanky.

Sunflowers

Native to North America, brilliant blooms and imposing stems.

  • Sunflowers require full sun and soil that drains well. Their ideal pH range is 6.0 to 7.5. Place the seeds approximately 6 inches apart and no deeper than an inch. After the seedlings reach 6 inches in height, thin them out so that the strongest plants are spaced about 12 inches apart.
  • In between waterings, allow the top 1 to 2 inches of soil to dry off.  Apply a slow-release fertilizer in the spring, as directed on the label, if your soil is poor.

Nigella

A delicate, exotic flower with a whimsical beauty. Others argue that August is the best month to plant.

  • When nigella seeds are buried in the ground in August, they will begin to blossom in May of the following year. Nigella should be planted in full sun in slightly acidic soil that drains well. Since light is necessary for germination, plant seeds 2 to 3 inches apart and cover sparingly. Plant seeds widely apart in a garden bed for a casual cottage garden look.
  • At a temperature of 60 to 65 degrees, germination takes 10 to 14 days. Till the top few inches of soil are thoroughly saturated, water it gradually but thoroughly. After planting Nigella damascena, fertilize the soil once a month using a general-purpose fertilizer. 

Sedum

Spread throughout nearly every continent, Sedum is a vast genus of flowering plants. Usually blooming late in the growth season.

  • The majority of sedum plants thrive in full sun, and they like soil that is loose, loamy, sandy, or gravelly with good drainage. Although they often tolerate humidity well, these plants need to be spaced widely for adequate ventilation to prevent powdery mildew. 
  • Dig a deep hole, level the root ball, insert the plant, backfill, and space 6-24 inches apart for growth, as the sedum spreads over time, ensuring proper space for growth.
  • Water the new sedum plants about once a week during the first year of their life. Sedum rarely needs further fertilizer. Composting your soil will typically be sufficient to give your sedum a boost if it’s of low quality. 

Lunaria

A delicate, Mediterranean plant, it inspires awe and wonder.

  • In addition to liking well-drained, humusy soil that stays consistently moist without being soggy, Lunaria plants grow well in both full sun and moderate shade. The temperature must be between 60 and 70 degrees Fahrenheit.
  • To get the plot ready for planting, loosen the soil until it is about 12 inches deep. Space the seeds 12 inches apart. Gently massage the earth over the seedling’s roots and place it inside the hole.
  • During the growing season, your Lunaria should have one inch of water every week in the soil. Apply organic or slow-releasing fertilizer to your plant to promote abundant blooming.

Planting specific flowers in August will help your garden remain beautiful well into the fall. Growing hardy annuals like calendula, sedum, and marigolds will ensure they flourish throughout the remaining warm days and bloom when the weather cools. Follow the above guide for flowers to plant in August.

Certainly! If you’d like to learn more, please consider following our WhatsApp Channel: Harvest Gardening

Q1. What are the perennial flowers to plant in August?

A1. Perennials can be planted in August, including asters, sunflowers, and coneflowers.

Q2. What colors are common for the August flower poppy?

A2.The August flower poppy’s most popular hues are pink, white, and red.

Q3. What are the best flowers to plant in August in Zone 7?

A3. The finest flowers to plant in Zone 7 in August are asters, chrysanthemums, zinnias, and marigolds. Zone 7’s late summer and fall weather is ideal for these flowers.

Pruning in August is a crucial duty for gardeners who want to maintain healthy, well-shaped plants. Some plants benefit from deliberate pruning when summer heats up, which promotes new growth, increases airflow, and prepares them for the next growing season. August is also great for pruning sick or dead branches off trees and shrubs, keeping them healthier overall. We will discuss a few tips for plants to prune in August in detail below.

Trimming some trees in August helps them keep their shape and encourages healthy growth. Consider trimming some of these trees in August. 

Philadelphus

Philadelphus, a genus of flowering plants native to Asia, North America, Central America, and South America, requires pruning for shape, growth, and flowering.

  • In many areas, philadelphus finishes flowering in August, at which point plants are trimmed. This gives the plant enough time to develop new growth so that it can bloom the next year.
  • Avoid pruning in spring to avoid fragrant flowers. Cut the thickest stems at the ground for fresh, robust shoots. Trim remaining stems by a quarter to a third.
  • Trim branches to outward-facing buds and reduce flowering stems to one-third of the original length. Avoid over-pruning to promote outward development and avoid hindering the following season’s blooming.

Bottlebrush

Bottlebrush, a Myrtaceae family flowering plant native to Australia, is known for its brilliant red flowers, which require pruning to maintain shape and attract more colorful blooms.

  • For bottlebrushes, pruning should be done as soon as flowering is over; in most cases, this means in August. Steer clear of late pruning, which may result in fewer flowers throughout the following flowering season.
  • Maintaining a tidy bottlebrush plant after summer flowering involves pruning off diseased, damaged, or dead branches to prevent illness spread and maintain its health.
  • Trim inward-growing branches to increase airflow, encourage more flowers, and maintain the desired form. Careful pruning stimulates new growth, carrying distinctive blossoms the following year.

Camellia

Asian natives of the tea family comprise the genus Camellia, which includes flowering plants. To ensure optimal development and an abundance of flowers, camellia plants need to be pruned.

  • A young camellia plant shouldn’t require pruning until it is about 4 years old unless you need to trim off any broken or unhealthy branches. To enable light to penetrate the interior of the bush, you should trim your camellias in August after they have finished blooming. 
  • Ensure clean and sharp pruning blades for blooming shrubs or plants. Eliminate unhealthy or dead wood for plant health and prevent illness spread. Examine natural growth patterns for variety before pruning. 
  • Retrim late in the season to prevent next-year buds removal. Lower Camellia height by pruning upper branches and removing lanky growth, based on hardiness zone.

Deciduous hedges

Deciduous hedges, which shed their leaves annually, provide seasonal interest with their ever-changing foliage patterns, and their density, health, and form require regular pruning.

  • A light trim can be done in mid- to late-summer to retain the shape of many deciduous hedges, August is an excellent time to do this. Your gardening style will determine the equipment you employ and the cutting technique.
  • Identify and remove infected, dead, or damaged branches, trim tops for sunshine distribution, and make small angle incisions above the bud for healthy growth.
  • Maintain a deadheading routine with pruning shears, trim dense interior branches, apply a balanced fertilizer, and ensure the hedge receives adequate water, especially in dry weather.

Oak trees

North America and Eurasia are home to the bulk of the world’s natural oak trees. To preserve the health of the tree and prevent diseases, proper timing and skill are necessary when pruning oak trees. 

  • Accurately identify oak types, evaluate tree health and age, and trim dead or damaged branches for young oaks, especially those under three years old.
  • Eliminate Water Sprouts and Suckers. Eliminating them stimulates the tree to produce more robust branches. To increase air and light flow to the tree’s core, trim off any smaller branches. 
  • Never trim a tree’s crown since doing so weakens the tree. Here’s how to chop it off. First, cut a small opening on the branch’s underside, around 6 to 12 inches away from the trunk. Next, step back from the initial cut by a few inches. 

Lavender

Native to the Mediterranean region, lavender is a flowering plant of the mint family. Pruning lavender is necessary to keep it in shape and promote more blooms. 

  • Hardy lavender is best trimmed around August in most regions, but you can tackle this possible problem any time of year. For precise cuts that won’t harm the plant, use clean, sharp pruning shears.
  • Trim sick, dead, or damaged stems, reduce plant height by one-third, and avoid pruning woody portions as it doesn’t guarantee reseeding.
  • Lavender cultivates best in dry conditions, so don’t overwater it. Mulch around the base of the plant to keep it moist and discourage weed growth, but keep it away from the root to prevent rot.

Many plants require pruning in August to keep them looking good and in good condition. Summer-flowering shrubs are perfect for pruning now that they have completed flowering and can be shaped for the following season. Deadheading wasted flowers and trimming back herbaceous perennials can encourage a rebloom or increase the plant’s general vigor. The above article discusses some plants to prune in August. 

Certainly! If you’d like to learn more, please consider following our WhatsApp Channel: Harvest Gardening

Q1. What are the perennial plants to prune in August?

A1. Perennials including asters, bee balm, coneflowers, daylilies, and phlox should all be pruned in August. This promotes new growth and keeps them in shape.

Q2. What should I avoid when pruning in August?

A2. Trim back spring-flowering shrubs in August to prevent removing flower buds for the next season and avoid over-pruning to prevent plant stress.

Q3. What are the evergreen plants to prune in August?

Q3. August is the perfect time to prune evergreens including juniper, boxwood, yew, and holly.

Native to Central Asia and the Middle East, Pistacia vera trees produce little, green nuts referred to as pistachio tree nuts. Pistacia vera is its scientific name. They are well-known for their unique flavor and vivid color, and people have enjoyed them for thousands of years. Up to 30 feet can be reached by pistachio trees. Similar to cashews, pistachios are not technically considered nuts. These are the seeds, not the fruit; they are drupes. They are an excellent source of fiber, protein, and heart-healthy fats, especially monounsaturated fats. 

The young trees, typically offered as potted nursery specimens, should be planted in the early spring when they are dormant. Planting pistachios takes meticulous planning. For your convenience, we’ve included detailed knowledge.

How to plant pistachio tree:

  • Pistachio trees grow best in regions with warm summers and moderate winters. Locate an area that receives full sun exposure. Pistachios love well-drained soils; steer clear of places with excessive clay or inadequate drainage. 
  • Create a hole that is slightly deeper and at least twice as wide as the nursery container. After taking it out of the pot, carefully plant the tree in the opening. The tree should be planted about an inch deeper than it was in the nursery container. Plant a mulch foundation to retain soil moisture and keep weeds at bay, and stake the tree for support. Keep a minimum of 20 feet between each tree. 
  • Remember that sufficient wind is needed for pollen from male trees to reach the female trees’ blossoms while planting. A male tree planted within fifty feet of a female tree can usually pollinate the latter.

Pistachio tree require special treatment to maintain healthy growth and a good production of nuts. This guide will assist you.

Pistachio tree care:

Watering

  • Pistachio trees thrive in arid environments and are highly resistant to drought. Water deeply but less regularly once the tree is established. Consider installing an irrigation system if you have multiple pistachio trees. 

Fertilization

  • In the early spring, before the growth season begins, apply fertilizer that is high in nitrogen; do not use too much. Have your soil tested to find out what deficiencies it might have before applying any fertilizer, if it lacks nitrogen, phosphorus, or potassium, you can adapt the fertilization to your tree’s nutrient requirements.

Pruning pistachio trees

  • Trim late winter or early spring to prevent the onset of new growth. Remove any branches that are growing directly across from one another and replace them with branches that are appropriately spaced around the trunk. Additionally, cut off any branches that are shorter than the lowest main branch; these branches should all be trimmed to a length of 4 to 6 inches.

Pistachio tree harvest

  • Harvesting pistachios usually occurs in late summer or early autumn. It will break from the inner husk and become a gorgeous pink-yellow color when they are ready to be harvested. After that, all you have to do is tap the branches to loosen the pistachios. Remove the epicarps within 24 hours of harvesting for optimal freshness and flavor.

Potting and repotting pistachios

  • Pistachios can grow to be fairly large, so use a container that is at least 14 to 16 inches deep. use a sunny spot. To avoid root rot, pistachio trees do best in potting mixes that drain properly. Pistachio trees usually require repotting every two to three years as they outgrow their containers. Before repotting, carefully trim the roots to promote growth and keep the tree from becoming root-bound.

Handling of diseases and pests 

  • In addition to botrytis, which can be problematic in rainy springs, especially for male trees, excessive moisture on your pistachios can cause Alternaria Late Blight. Keep an eye out for pests like scale insects and aphids. Infestations can be managed with the use of the right insecticides and routine monitoring.

Any garden or orchard would benefit from the unusual and satisfying addition of pistachios. They provide a triple threat of advantages for farmers and gardeners with their gorgeous foliage, aromatic blossoms, and tasty nuts. It takes a lot of work to grow pistachio trees since they are dioecious and require adequate pollination. You may successfully cultivate a healthy pistachio tree according to the preceding steps. 

Certainly! If you’d like to learn more, please consider following our WhatsApp Channel: Harvest Gardening

Q1. What are the ideal growing conditions for a Chinese Pistachio tree?

A1. Chinese Pistachio trees grow best in full light and well-drained soil. They favor an environment with mild winters and scorching, dry summers.

Q2. How to grow a pistachio tree indoors?

A2. Pistachios grow best indoors in well-draining soil with a pH of neutral to slightly alkaline; they also need lots of sunshine and space. Refrain from overwatering to prevent root rot. 

Q3. What are the main types of pistachio trees?

A3. Golden Hills, Peters, and Kerman are the three primary varieties of pistachio trees. The most popular variety, Kerman, is prized for its superior nuts.

Q4. Where do pistachio trees grow?

A4. Although they originated in the Middle East and Central Asia, pistachios are currently grown in many climate-suitable regions of the world. They include Turkey, Iran, Turkey, Italy, and California.

Q5. What are the growing zones for pistachio trees in the USA?

A5. USDA Hardiness Zones 7-9 in the US are ideal for pistachio trees due to their hot, dry summers and moderate winters, particularly in Arizona, New Mexico, and California.

A tropical fruit with a characteristic spiky look, pineapple is prized for its vivid, sweet-tart flavor. It is known as Ananas comosus in science. Although it originated in South America, specifically in the area between southern Brazil and Paraguay, it is currently grown in many warm climes worldwide. Pineapple, a member of the bromeliad family, is a herbaceous perennial. This article provides information about planting and proper maintenance of pineapple plant.

Pineapple cultivation is relatively easy. This step-by-step tutorial will help you plant a pineapple, which is a somewhat easy and enjoyable activity.

Learn how to plant a pineapple:

  • Choose a pineapple that is ripe and has vibrant green leaves. Slice off the pineapple’s top using a sharp knife. Take off any extra fruit and some of the lower leaves. The stem just needs to be partially submerged when placing the dry crown in a glass of water. Every few days, change the water. 
  • After roots appear, plant in a sandy loam that drains well and is rich in nutrients. Plant crowns with 1-3 feet separating them in full sun. Assume that the leaves of the pot are above the soil by checking for drainage holes. Provide a bright windowsill for a pineapple to sit in and expose it to six to eight hours of sunshine each day. The long, sword-like leaves of pineapple plants can grow to be as much as 5 feet long in mature plants, or 2 to 8 inches long in young ones.

A pineapple plant is relatively simple to care for, but the appropriate approach must be used. These pointers will assist you in taking good care of this plant.

Pineapple plant care:

Water properly

  • Throughout its life, give your pineapple plant plenty of water. But avoid drowning the pineapple by overwatering; instead, let the soil dry out entirely before adding more water. To minimize evaporation, apply a thick layer of mulch to your plants if you are a chronic forgetter about watering them.

Fertilizer for pineapple plants

  • Composting the soil before planting is the best approach to nourish your pineapple. However, if you’d like, you can fertilize young pineapple plants once a month during their growing season with a light liquid fertilizer. Avoid using synthetic or heavy fertilizers as they may cause the plant to burn.

Pruning and Propagating

  • Plant health is not the primary concern when pruning a pineapple plant, beauty comes first. To achieve a more uniform appearance, simply trim off the longer leaves. Cutting off the leafy top of a ripe pineapple is one way to propagate a new pineapple plant. Before planting it in the ground, allow it to dry for a few days.

Potting and Repotting Pineapple

  • Repotting pineapples is usually not necessary. The plant will start producing branches from its base as it ages. When you harvest the fruit, the mother plant will start to deteriorate, so it’s best to eliminate it and focus on the offshoots. Choose a slightly larger container with good drainage and fresh soil mix.

Warm and Moisture

  • Humidity ranges from moderate to high ideal for pineapple plants. Temperatures between 65 and 95 degrees Fahrenheit are ideal for pineapple plants to grow in. Once the weather cools off, make sure you bring the plant inside to a well-lit area. Mist the plant occasionally to enhance humidity if you live in a dry region. 

Common diseases and their solutions

  • There are several typical issues with pineapples. Aside from black rot and white leaf spot, other diseases that could damage pineapple are bacterial butt rot. Aphids, scales, and mealybugs should be avoided. Apply neem oil or insecticidal soap to the plant if you find any. To lessen the chance of pests, keep the plant happy and healthy.

In a tropical climate or, with the right care, indoors, growing pineapple plant may be a tasty and fulfilling experience. It takes a while for each plant to provide a single fruit—between 18 and 24 months. Once established, pineapple plants only require routine watering and sporadic fertilizing, making them comparatively low-maintenance. If you follow the above guidelines, you should be able to harvest an abundance of delicious, sweet pineapples.

Certainly! If you’d like to learn more, please consider following our WhatsApp Channel: Harvest Gardening

Q1. Do pineapple plants need full sun?

A1. Yes, full sun is necessary for pineapple plants to grow well. For best growth, they need at least six hours of direct sunlight per day.

Q2. Can dogs have pineapple?

A2. In moderation, dogs can consume pineapple, but they should avoid the skin and core because they are difficult to digest.

Q3. What type of soil is best for growing pineapples?

A3. Pineapples thrive on acidic, well-drained soil with a pH of 5.5-6.5 and organic matter like humus or compost, with a combination of compost, perlite, and peat moss providing optimal aeration and moisture retention.

Q4.  What are the main types of pineapple plants?

A4. The four primary varieties of pineapple plants are Abacaxi, Queen, Red Spanish, and Smooth Cayenne.

Q5. How long does a pineapple plant live?

A5. Pineapple plants can have varying lifespans as perennials according to climate, variety, and care. Your pineapple plant’s lifespan may be increased with the right situations and care.

The origins of avocado trees were probably in Southern Mexico. Persea americana is its scientific name. Indoor avocado trees are a distinctive and satisfying addition to any area, adding a touch of tropical elegance to your house. These trees provide a lovely and natural touch to any interior area with their eye-catching foliage, graceful branches, and capacity to provide delicious fruit. You will be able to successfully cultivate an indoor avocado tree by following the guidelines below.

You may still enjoy fresh avocados without having a garden by growing avocados in containers, which is a satisfying procedure. Here is a detailed how-to.

Growing avocados in containers:

  • Take the seed out of a ripe avocado, wash it, and allow it to air dry. Place three toothpicks into the seed and hang it over a glass of water, wide end down. Pour in enough water to cover the seed by about 1 inch. Change the water in the glass every few days and place it in a warm, sunny setting.
  • When the stem reaches 6-7 inches in length, trim it back to approximately 3 inches. Within two to six weeks, the seed ought to germinate. It’s ready to plant when the roots are deep and the stem has new leaves. 
  • A well-draining potting soil mixture should be added to the container. When planting a seed, drill a little hole in the middle of the dirt and place the seed inside a pot with a diameter of roughly 10 inches, leaving half of the seed exposed above the earth. Ensure there is a drainage hole in the pot.

Caring for avocado trees is normally easy, and when avocados are grown as houseplants, here are some comprehensive tips to help your indoor avocado tree thrive.

Indoor avocado tree care:

  • Avocado plants need six to eight hours of direct sunlight per day to grow. If you’re starting from a seed, you can keep it on a sunny windowsill until the roots begin to grow and the first leaves appear. You won’t be able to see fruit on your tree until you supplement the little sunlight with an artificial grow light when it comes inside.
  • Avocado trees perform well with a rich, quickly-draining potting soil mix. During the growing season, fertilize your avocado houseplant weekly to monthly with a tiny amount of water-soluble food to preserve its rich green leaves. A fan placed close to the tree might help with air circulation, as the trees require chilly nights to bear fruit.
  • Avocado trees require water to grow, but too much is not ideal, water the plant only when the soil feels completely dry. During their heated growing season these trees being tropical require a constant 50% humidity level. 
  • When the plant reaches barely 12 inches in height, it is time for its first substantial cutting. To encourage the formation of new branches as it grows taller, pinch off new growth throughout the summer. To propagate avocado trees take out the pit and wash the avocado to remove any extra flesh. After inserting a web of toothpicks into the pit, hang it over a warm water glass. The branch is cut off and put in the ground once a network of roots has formed.
  • Every spring, when the avocado plant starts to develop again, give it a new home. Your avocado tree should be potted up in a 15–20 gallon container. The avocado plant may need to be replanted if you start it smaller because it will eventually exceed its pot.
  • There are several potential causes for browning leaves on your avocado tree, the tree might not be receiving enough water. If so, be sure to water the tree each time the ground dries out. The absence of bug pests is one advantage of growing avocados indoors, if pests are found, remove them right away with neem oil or insecticidal soap.

In conclusion, for people with limited space or unfavorable conditions, growing an indoor avocado tree is a feasible and fruitful solution. Selecting the proper variety is important. Given enough care, avocado trees grown in containers can still provide a fair crop even though they might not grow as big as those planted in the ground. You may get all the advantages of having an avocado tree indoors, including fresh avocados, according to these rules.

Certainly! If you’d like to learn more, please consider following our WhatsApp Channel: Harvest Gardening

Q1. Can you grow an avocado tree indoors?

A1. If provided a bright, sunny area to receive full sun, avocado trees can flourish indoors. They do, however, grow swiftly, so you’ll want to think about finding a location with an area to grow.

Q2. What is the best avocado tree for indoors?

A2. Particularly the female Type A trees (Gwen, Pinkerton, and Holiday) and the male Type B trees (Fuetre, Bacon, and Zutano) are smaller varieties of avocado trees that thrive nicely inside.

Q3. How fast do avocado trees grow?

A3. Avocado trees are quick growers, sprouting up to 30 inches per year. Depending on conditions such as soil, climate, hydration, and pruning, these trees can grow at different rates. 

Q4. How to prune indoor avocado tree?

A4. To manage the height of an indoor avocado tree and promote bushier growth, trim back the upper leaves and branches, making cuts slightly above a node (the place where a leaf joins the stem). To preserve the general health of the plant, remove any dead or diseased branches.

Fruit trees that can withstand drought are crucial for sustainable gardening and farming in areas with water scarcity. When planted, these trees require constant watering, but they can withstand droughts once established. For more information on drought-tolerant fruit trees, refer to the article. 

Gardeners especially enjoy drought-tolerant fruit trees. Uncover which heat-tolerant fruit trees to cultivate in hot climates and how to care for them.

Heat-tolerant fruit trees:

  1. Olive

Olive trees that never lose their leaves are symbols of the Mediterranean region and thrive in hot, dry climates. 

  • The olive tree should be planted in full sun on well-drained soil that has a pH between slightly acidic and neutral. Several kinds can be grown together to maximize fruit output. Water deeply to promote deep root growth, allowing the soil to dry slightly in between waterings. 
  • In spring and summer, treat olive trees with a balanced fertilizer and pay attention to the manufacturer’s instructions for the proper dosage. Minimal pruning is necessary to encourage a nice shape and get rid of any dead wood. Avoid pests and illnesses by using the proper treatments, such as organic insecticides or soaps that kill insects. 
  1.  Almond
    Native to the Middle East and Mediterranean regions, almonds are a type of tree nut. 
  • Trees planted in holes that are 20–25 feet apart and 12–18 inches deep are ideal for almonds. Almonds also like rich, well-draining soil with a pH of 6.0–8.0. Almond trees require constant irrigation in the summer, but once established, they are extremely.
  • All-in-one almonds, which require less than 15 feet of space, are the most popular variety for home producers. If necessary, fertilize in the early summer using a balanced blend. Remove any diseased or dead branches in the summer by light pruning; do not over-prune during this time of year. Use IPM techniques, such as using helpful insects. 
  1. Mulberry 

The tasty fruit, lovely foliage, and adaptability of the mulberry tree or shrub, which is native to Asia, have made it popular. 

  • For mulberry, loamy soil is ideal. Select a location for it that receives the majority of the day’s sunlight. Watering young trees frequently in the early stages helps them develop vast root systems, which helps them withstand severe droughts.
  • A yearly balanced fertilizer application should be made to the tree in the early spring. Mulberry trees can be trimmed to maintain a more manageable height and promote strong development. Mulberry trees can quickly reach heights of 15–30 feet. Use neem oil or insecticidal soap to keep pests like spider mites and whiteflies at bay. 
  1. Pomegranate

Native to the Middle East and Mediterranean regions, pomegranates are colorful, old fruit-bearing trees or shrubs. They tolerate dryness and require very little care. 

  • Pomegranates need soil that drains well, and they do best in a sunny location with at least 6 to 8 hours of direct sunlight every day. Though they can withstand drought, established pomegranate trees require frequent irrigation, particularly when the fruit is developing. Growing from seed to fruit in one to three years, this tree is also very easy.
  • Apply a layer of well-rotted manure or compost as an autumn mulch. Pruning is typically unnecessary for trees that provide fruit on old wood, but you should remove any sick or dead branches. In case of mild infestations, utilize neem oil or insecticidal soap. 
  1. Dragon Fruit

Native to Central and South America, dragon fruit is a vivid tropical fruit that is currently grown extensively in Asia and other continents. It also grows easily and requires little care, being relatively low-maintenance in hot areas. 

  • Well-draining soil is ideal for dragon fruit trees, which also require full sun for at least 6 to 8 hours each day. Due to its tropical cactus nature, dragon fruit requires a moderate amount of watering. Every two to three months, apply a balanced fertilizer.
  • Regular pruning helps to form the plant and get rid of dead or broken branches. It has a 6–10 foot height range. Use fungicides if needed and keep an eye out for pests such as mealybugs, aphids, and scale insects. 
  1. Loquat

The loquat, an evergreen shrub or tree native to Asia, is highly valued for both its decorative and sweet, juicy fruit.

  • Select an area that receives full sun and well-draining, slightly acidic to neutral soil. After they are established, loquat trees can withstand droughts, but during their early growth, they need to be regularly watered. Mulch the tree’s surroundings and keep the area weed-free.
  • Utilize balanced fertilizer, including equal amounts of potassium, phosphorus, and nitrogen. When mature, locust trees may reach heights of 25 to 30 feet. To keep the tree in form, prune it often. Utilize suitable chemical or biological controls to prevent pest infestations.

In summary, Drought-tolerant fruit trees are sustainable and cost-effective for water-limited areas, requiring proper soil preparation, mulching, and water-saving techniques. Dragon fruit, almonds, and loquats can withstand high temperatures, making them a viable option. 

Certainly! If you’d like to learn more, please consider following our WhatsApp Channel: Harvest Gardening

Q1. What are drought-tolerant fruit trees of Southern California?

A1. Pomegranate, olive, loquat, and other fruit trees are among those that may withstand drought in Southern California. 

Q2. What are some examples of drought-tolerant fruit trees suitable for Texas?

A2. Fig, pomegranate, and jujube trees are a few varieties of drought-tolerant fruit trees that grow well in Texas. 

Q3. What is the best fertilizer for drought-tolerant fruit trees?

A3. Diffuse-tolerant fruit trees require a slow-release, balanced fertilizer with equal amounts of potassium, phosphorus, and nitrogen, provided once or twice a year.

Q4. What are some drought-tolerant fruit trees suitable for Zone 9?

A4. Zone 9 can benefit from drought-tolerant fruit trees such as pomegranates, figs, olives, and some citrus kinds including Meyer lemons.

Q5. What are some examples of shade-tolerant fruit trees?

A5. Fruit trees that can withstand shadow include elderberry, mulberry, serviceberry, and pawpaw.

A fungus and a photosynthetic partner, usually an alga or cyanobacterium, combine to form the amazing symbiotic organisms known as lichen. They have a range of shapes and sizes, such as crustose, foliose, and fruticose, and they have different hues and textures. Lichens may survive in temperate forests and deserts. Although lichens are usually benign, fruit tree producers may become concerned when seen on their trees. These are some crucial methods for treating lichen issues on trees. 

Plants can occasionally suffer health problems from lichens, although they are not very damaging. To enhance your tree’s health by removing lichen, think about using these remedies. 

Tree lichen treatment:

  • Physical Disposal

If the growth of lichen becomes troublesome, you can want to manually remove it. Lichen are frequently observed on the fruit tree bark in orchards. Scrubbing the tree’s bark lightly with a soapy solution is one method. Lichen on tree bark has a very thin attachment, so it should peel off with ease. To remove the lichen from the tree, use mild pressure. Don’t damage the tree bark by being careful. 

  • Chemical Handling

Chemical therapies might be thought about in severe situations. Treating the tree with copper sulfate spray is another way to eradicate tree lichen. Apply during dormant seasons to prevent hurting the tree’s leaves, and read the manufacturer’s instructions before using any chemical control measures. For treating tree lichen, apply copper sulfate only in late spring or early autumn. 

  • Organic remedies

Spray the lichens with a mixture of equal parts vinegar and water. Over time, this may aid in killing and loosening the lichen. Plant trees where they will receive plenty of sunlight and airflow, and inspect them frequently for growth and other problems. Ladybugs, among other insects, can help regulate the populations of lichens that some birds and insects eat.

  • Reducing plant health and relocation

Changing the environment in which tree lichens thrive may be the most effective way to cure them. If you have a sprinkler system, be sure it doesn’t spray the lichen growth frequently since it will encourage it to expand. Reduce overgrown branches to increase light penetration and airflow. Especially in the dry months, make sure the tree receives adequate water. Use a balanced fertilizer to improve overall tree health.

  • As healthy trees are less vulnerable to stress, it will be harder for lichens to establish themselves. Make sure fruit trees receive the right nutrients. For lichen to not develop too quickly, there must be sufficient air movement. Enhancing ventilation reduces the conditions that are conducive to the growth of lichen.
  • Lichen prefers moist conditions; do not overwater them, as this can encourage the growth of lichen. Preserve ideal soil conditions by using appropriate watering techniques. Only in extreme cases can chemical control be employed because it can destroy nearby ecosystems and beneficial creatures.

In conclusion, due to the chronic nature of lichen disorders such as lichen planus and lichen sclerosis, treatment for lichen often requires a multimodal approach. You can get rid of lichen using physical, chemical, or natural methods as described above to improve your plant’s health. Regular maintenance and preventative measures can keep your plants healthy and free of these. Its growth can be managed by ensuring adequate nutrition and soil moisture monitoring. 

Certainly! If you’d like to learn more, please consider following our WhatsApp Channel: Harvest Gardening

Q1. What is lichen?

A1. A symbiotic interaction between fungi and algae or cyanobacteria gives rise to the complex creature known as lichen.

Q2. Is tree lichen harmful to humans?

A2. Generally speaking, tree lichen poses little threat to people. However, some people may find that handling lichens causes slight skin discomfort.

Q3. How do I recognize the lichens on trees?

A3. The distinctive appearance of lichen, which frequently takes the shape of crusty, leafy, or branching growths on tree bark, helps to identify it. It might be green, yellow, orange, or white.

Q4. What are the main types of lichens found on trees?

A4. Crustose, foliose, and fruticose lichens are the three principal kinds that grow on trees. Fruticose lichens have a bushy or shrub-like look, foliose lichens have a structure resembling leaves, and crustose lichens develop a crust-like appearance.

Alocasia is the scientific name for the Elephant Ear Plant. The plant is native to Asia, Eastern Australia, and other tropical and subtropical countries. It likes warm, humid climates. They can be cultivated outside in warm climates or indoors as houseplants. During the summer, gardeners in milder areas frequently relocate them outdoors. These are poisonous if consumed, therefore it’s crucial to keep them out of the hands of young children and dogs. This article goes into great length about taking care of and cultivating elephant ear plants.

Elephant ear plants require a moderate level of care, whether they are planted in a garden or as houseplants. For developing elephant ears, these are the primary maintenance needs.

  • Based on the amount of shade or sun exposure in your area, choose a location. A minimum temperature of 70°F should be attained in the soil before planting the elephant ear plant outside. It may be necessary to work compost into the ground as a pre-planting step if the soil is rich and slightly acidic, as it prefers moist conditions. 
  • Create a hole for the lightbulb that is 4 to 6 inches deep. The tubers should be planted 4 inches deep. Maintain a minimum distance of 2 feet between smaller and larger types. To keep the soil always moist, water it frequently.
  • Verify that the plant is at the same level as it was in its pot by placing it in the hole and replenishing it with soil. Apply a high-nitrogen fertilizer regularly to the elephant ear plant. To assist conserve moisture and control soil temperature, spread a layer of mulch around the base of the plant. 

Some techniques you should be aware of include the growth and upkeep of elephant ear plants. These pointers will assist you in taking good care of it. 

Proper watering:

  • Elephant ear plants are a type of marsh plant that requires a lot of water. In six inches of standing water, the plants thrive. When the soil seems dry in the top two inches, water the plant. Avoid overwatering as this might lead to root rot. In warmer weather especially, water the soil frequently to keep it moist. 

Apply fertilizer:

  • The elephant ear Plant is a heavy feeder, much like many other large-leaved tropical plants. Throughout the growing season, use a water-soluble, high-nitrogen fertilizer every two to three weeks.

Pruning of elephant ear plant:

  • When new growth is desired during the growing season, remove any yellowing or browning leaves. Trim the leaves close to the plant’s base two to three days after the first frost, being careful not to rip or tear the leaves. Periodically wipe leaves to maintain dust-free foliage.

Propagating elephant ears:

  • Dividing the tubers is a frequent method for propagating elephant ear plants. Using a sterilized knife, split the tubers, then dry them inside. To check if the tuber is rotting, wrap it in paper, put it in a cardboard box, and store it in a cold cellar. If it is, trash it. Once the soil has warmed to a minimum of 70°F, plant the tubers in spring.

Potting and Repotting of elephant ear plant:

  • For cultivating elephant ear plants, use sizable containers with enough drainage. When the tubers grow too large for the pot, repotting is required. To revitalize the plant, divide it and repot individual tubers in pots with new growing media.

Remedies for typical plant ailments and pests:

  • Fungal leaf blight is the elephant ear plant disease that is most prevalent. Before the fungus spreads to the entire plant, remove infected collapsed leaves as soon as possible. Spider mite infestations can cause leaf drop and slowed growth, so check the plant frequently and take urgent corrective action if necessary. Apply insecticidal soap or horticultural oil to treat a severe infestation of spider mites.

In conclusion, gardeners and plant enthusiasts often choose the elephant ear plant, which is a lovely and adaptable addition to any outdoor or interior area. It will quickly become a favorite in your collection thanks to its distinctive leaves and versatility. You may appreciate the sophisticated and exotic beauty of the elephant ear plant in your own house or garden according to the basic maintenance guidelines mentioned above.

Certainly! If you’d like to learn more, please consider following our WhatsApp Channel: Harvest Gardening

Q1. How to Grow elephant ear plant indoors?

A1. An indoor elephant ear plant does best in well-draining, loamy soil and requires bright, indirect light. Avoid placing the leaves on the windowsill since the sun can scorch them. For these indoor plants, the optimal temperature range is 65°F to 75°F.

Q2. What are the common types of elephant ear plants?

A2. Elephant ear plants come in three common varieties: Colocasia, Alocasia, and Xanthosoma. Every variety has distinct qualities and needs for growth.

Q3. How to propagate elephant ear plants?

A3. Divide the tubers or corms of elephant ear plants in the early spring, making sure that each section has at least one bud. Replant the divisions and maintain moisture in well-draining soil.

Q4. Why are the elephant ear plant leaves turning yellow?

A4. A plant may require less sunshine, water, or fertilizer if its leaves turn yellow. To solve the problem, trim off the yellow leaves and bide your time till they sprout again in the spring.

Q5. Are elephant ear plants perennials?

A5. Yes, elephant ear plants (Alocasia, Colocasia, and other species) are perennials. In warm climates, they can live year-round, but in colder climates, they might need to be dug up and kept for the winter.

Garden beans, sometimes referred to as shell beans or horticultural beans, are a kind of legume that is part of the Phaseolus vulgaris family. This kind of legume is commonly grown for its nutrient-dense and adaptable pods. These beans give a lot of nutritional value to a diet because they are an excellent source of fiber, protein, and important vitamins and minerals. Horticultural beans make a great addition to any garden, regardless of gardening experience level. They grow in a range of environments, need little care, and require very little upkeep. Here are some expert tips to boost them. 

Here is a quick, step-by-step tutorial on planting horticulture beans. You can effectively plant and grow it if you follow the steps below. 

Planting horticultural beans:

  • It’s best to plant horticultural beans in the spring because they grow quickly as annuals and are very simple to grow. They require 6 to 8 hours of sunshine per day in a bright area. Add compost or well-rotted manure to loamy soil to prepare it.
  • Seeds should be sown in seed trays or pots two to three weeks before the final frost date. Plant seeds 2–3 inches apart and 1-2 inches deep. Water thoroughly but gently. Utilize mulch, the moisture retention helps their short roots. Thin seedlings should be spaced 3–4′′ apart. Plants should be hardened off before being moved. 
  • The amazing property of horticultural beans is their inherent capacity to fix nitrogen in the soil. As bean seeds have sensitive roots and do not take well to transplanting, it is better to sow beans directly for successful growth. 
  • Watering properly

Weekly watering of horticultural beans requires one inch. Examine the dirt around the base of the plants with your finger to see if they want watering. To prevent spilling dirt onto leaves, which can result in soil-borne illnesses, use a drip irrigation system for extra watering.

  • Fertilizing

Avoid using a fertilizer with a lot of nitrogen since horticultural beans fix nitrogen in the ground. During the growth season, feed the plant according to the directions on the package using a balanced fertilizer, such as 10-10-10 NPK.

  • Trimming

Except for removing the plants from the ground as winter approaches, horticultural beans don’t require any pruning. These are annuals, meaning they die off and don’t come back every spring. Permit the beans to grow for as long as possible; these legumes fix nitrogen in the soil by absorbing it from the atmosphere.

  • Harvesting horticultural beans

Horticultural beans require constant picking, the more you harvest, the more beans the plants will yield. Harvesting can begin as soon as the beans develop. If you want to harvest beans without hurting the plant, use clippers or a gentle tug to remove the beans from the vine. After harvesting, you can either boil the beans or blanch and freeze them. Refrigerating these will keep them fresh for up to a year. 

  • Typical illness

Additionally, horticultural bean plants can be impacted by fungi diseases like mosaic virus and white mold. Avoid packing the plants too closely together, allow plenty of airflow, and keep the vines dry to help stave off illnesses.

In conclusion, horticultural beans are a versatile and enjoyable crop to grow, with various advantages for gardeners and cooks alike. This is a nutritious and delicious addition to any dish. You’ll have an abundance of tasty and healthy pods from these beans that you can cook, eat, or save for later. Horticultural beans are easy to plant, maintain, and harvest if you follow this guide’s easy guidelines. 

Certainly! If you’d like to learn more, please consider following our WhatsApp Channel: Harvest Gardening

Q1. When to pick horticultural beans?

A2. The ideal conditions for harvesting horticultural beans are plump and solid pods with well-formed, but not hard, beans inside. 

Q2. How to grow horticultural beans indoors?

A2. While it is possible to produce horticultural beans indoors, grow lights will probably be required in addition to natural sunshine.

Q3. How should you store horticultural beans?

A3. Horticultural beans should be kept dry and cold in an airtight container. They can remain fresh for up to a year if stored properly.