")
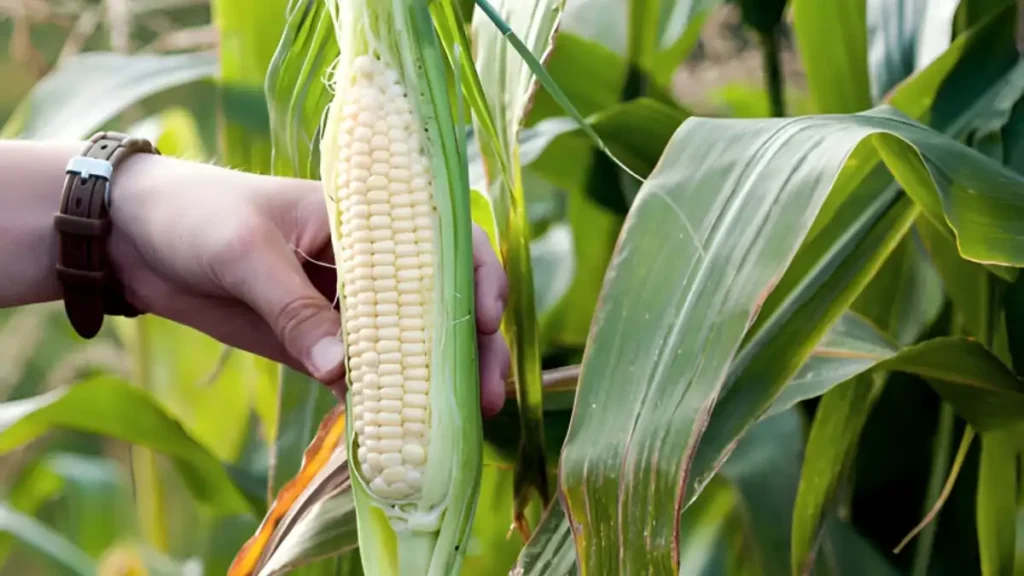
Walk down any grocery aisle, and you’ll see it: golden ears wrapped in green husks, sitting quietly next to the tomatoes as if it’s just another vegetable. But corn is far from ordinary. It’s one of the most genetically diverse crops on the planet, grown on every continent except Antarctica, and used in everything from breakfast cereal to biofuel to bourbon.
The twist that most people overlook is that not all corn is made equal. Botanically speaking, the kernels that turn into fluffy popcorn are distinct from those that turn into cornmeal, which is distinct from the juicy, sweet corn you grill at a summer cookout. Knowing different types of corn is more than just knowledge; it may improve your cooking, gardening, shopping, and even nutrition label reading.
We’ll go over each of the main types of corn, their characteristics, and how to choose the best one for your upcoming recipe, planting season, or curiosity-driven Google search.
What exactly is corn, botanically speaking?
Before we go into the many types, let’s first define corn. Corn (Zea mays) is a grass family cereal grain that originated in Mesoamerica and was domesticated approximately 9,000 years ago from a wild grass known as teosinte. In theory, each kernel is a fruit, a single-seeded structure known as a caryopsis.
What separates one type of corn from another comes down to three things:
- Kernel structure — the ratio of soft (floury) starch to hard (flinty) starch inside the kernel
- Sugar content — how much of the starch has converted to sugar
- Color and genetics — pigmentation controlled by specific genes
These small differences are the reason a kernel of popcorn explodes under heat while a kernel of sweet corn simply softens.
The 7 major botanical types of corn
Agronomists classify corn into seven primary types based on kernel composition. This is the foundation everything else builds on.
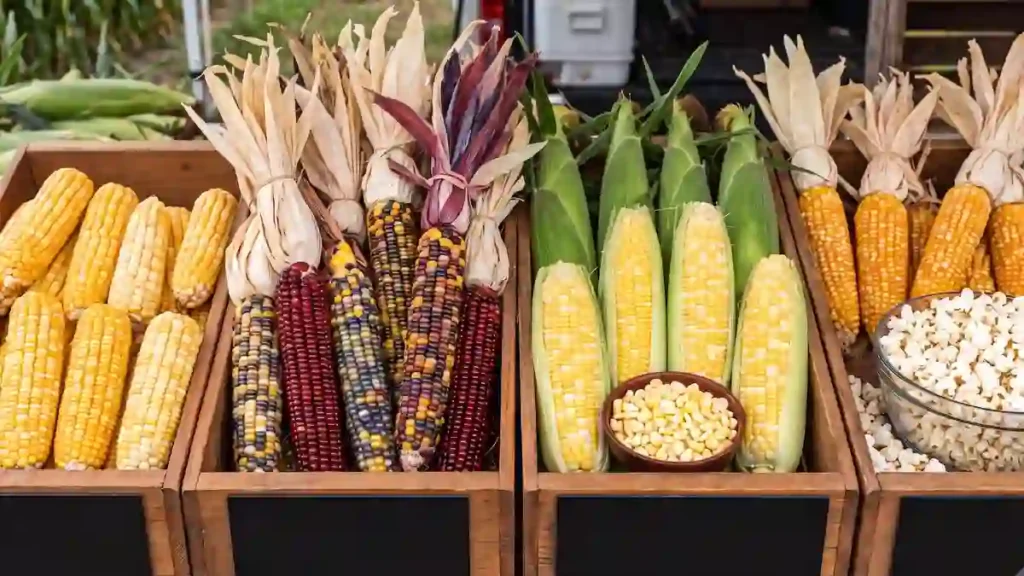
1. Dent corn (Field corn)
The great majority of corn farmed in the US is dent corn, which is the backbone of American agriculture. Because the soft starch shrinks more quickly than the hard starch around it, a tiny dent appears at the top of each kernel as it dries, giving it its name.
Common uses: Livestock feed, ethanol production, corn syrup, cornstarch, and processed foods. This is not the corn you eat off the cob.
2. Flint corn (Indian corn)
Flint corn is prized for its hard, glassy outer shell, which gives it excellent storage life and resistance to pests. It’s often the colorful, multi-hued corn you see as autumn decoration.
Common uses: Polenta, grits, hominy, and decorative fall displays. It’s a staple in Latin American and Italian cuisine.
3. Sweet corn
When most people hear the term “corn,” they imagine this type of corn. Sweet corn is collected when it is still young, when sugar levels are at their highest and before the starch fully develops. It tastes sweet and remains soft because of this.
Common uses: Corn on the cob, canned corn, frozen corn, salads, and salsas.
4. Popcorn
Popcorn has a small, hard kernel with a dense hull and a tiny amount of moisture trapped inside. When heated, that moisture turns to steam, and the pressure builds until the kernel explodes — turning it inside out.
Common uses: Snack food, movie theater staple, and increasingly, gourmet flavored treats.
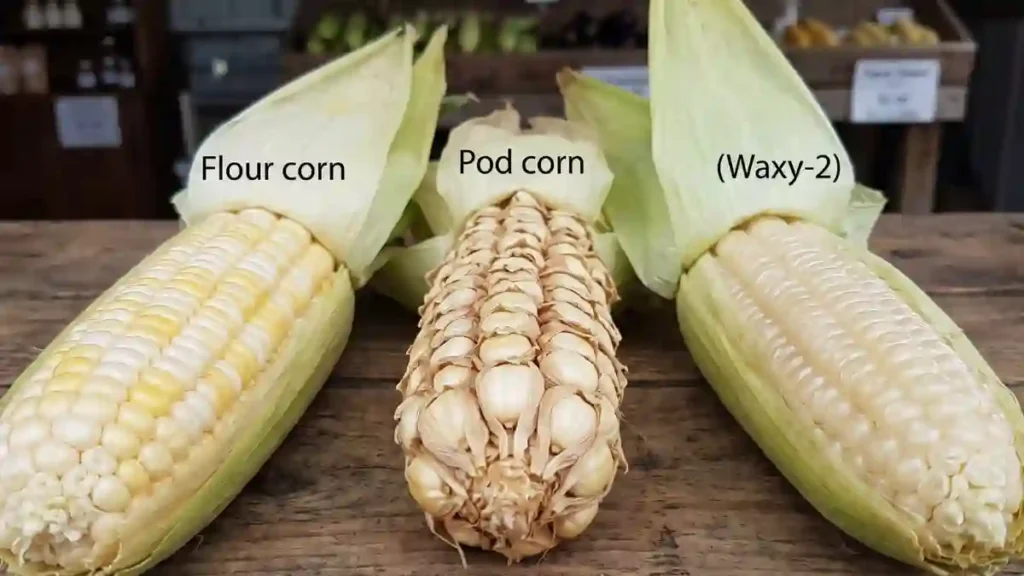
5. Flour corn
Almost all of the starch in flour corn is soft, which makes it simple to grind into a smooth, fine flour. It was historically important to Native American tribes in the American Southwest and is one of the earliest varieties of maize to be cultivated.
Common uses: Cornmeal, tortillas, baked goods, and traditional flatbreads.
6. Pod corn
Pod corn is an uncommon kind in which, in addition to the outer husk of the ear, each kernel is encased in a tiny husk. Although it is genetically fascinating and occasionally produced for research or novelty, it currently has little commercial use.
Common uses: Rarely eaten commercially; mostly of academic and historical interest.
7. Waxy corn
Waxy corn contains starch that is almost 100% amylopectin, giving cooked products a glossy, sticky, waxy texture — hence the name. It’s increasingly popular in Asian cuisine and industrial food production.
Common uses: Noodles, thickeners, adhesives, and specialty food products requiring a chewy texture.
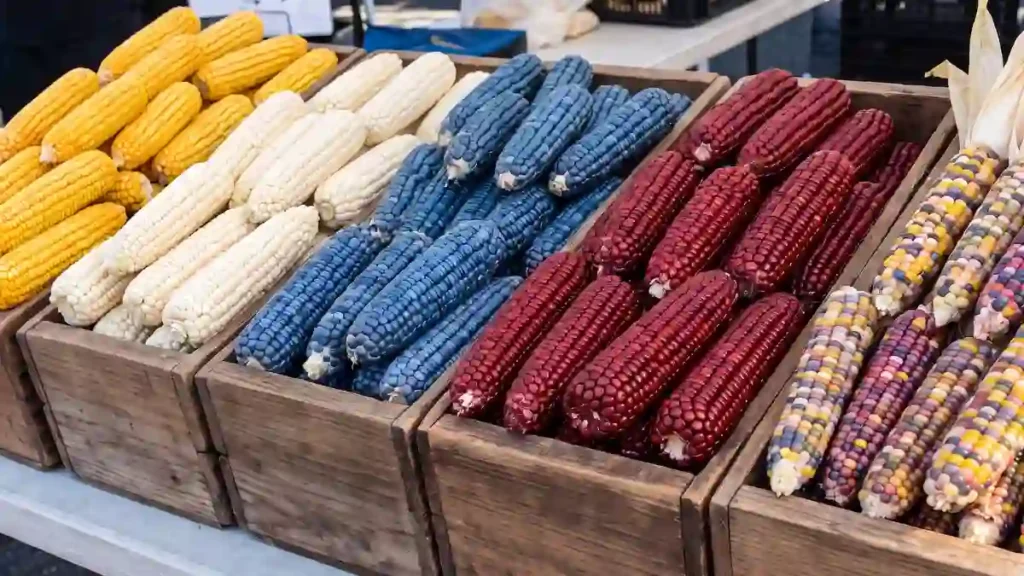
Types of corn by color
Beyond structure, corn is often categorized by the pigment in its kernels. Color comes from anthocyanins and other plant compounds, and in many cases it also signals a nutritional difference.
Yellow corn
Yellow corn, the most well-known variety, is coloured by beta-carotene and other carotenoids. It is rich in lutein and zeaxanthin, substances associated with eye health, and is found in both sweet corn and dent corn varieties.
White corn
White corn has a milder, slightly sweeter flavor than yellow corn and is a favorite for making white cornmeal, grits, and traditional tortillas in Mexican cuisine. It lacks the carotenoid pigments found in yellow corn.
Blue corn
Native to the American Southwest and Mexico, blue corn owes its striking color to high levels of anthocyanins — the same antioxidant-rich pigments found in blueberries. It’s often ground into flour for blue corn chips, tortillas, and atole (a traditional corn-based drink).
Red corn
Red corn is a less common yet aesthetically pleasing ingredient that is frequently utilised in speciality flours and ornamental applications. It has a distinct anthocyanin profile from blue corn, which gives it its colour.
Multicolor (Rainbow/Glass Gem) corn
Varieties like Glass Gem corn produce ears with kernels in nearly every color of the rainbow on a single cob. While visually spectacular, these are typically flint corn varieties grown more for ornamental use and seed-saving than for eating fresh.
Types of corn by use case
If you find botanical classification overwhelming, consider corn from the perspective of its true uses.
Corn for eating fresh
Here, sweet corn is the solution. When you go shopping, look for neatly packed kernels, moist silk, and vivid green husks.
Corn for grinding into flour or meal
Flour corn and flint corn dominate this category. Flour corn gives a finer texture; flint corn (used for masa and polenta) gives more bite.
Corn for snacking
While roasted corn kernels, a popular snack in South America and Asia, are usually made from a starchy field or flint corn variety, popcorn is the clear winner.
Corn for livestock and industry
The vast majority of industrial and agricultural uses for dent corn include cow feed, ethanol fuel, and corn syrup, which is used in a variety of packaged goods.
Corn for ornamental use
Flint corn, pod corn, and multicolor varieties like Glass Gem are prized for their visual appeal in fall wreaths, centerpieces, and garden displays.
Nutritional snapshot: How corn types compare
| Corn Type | Primary Use | Sugar Content | Sugar Content | Common Color |
| Dent Corn | Feed, industrial | Low | Mixed soft/hard | Yellow, white |
| Flint Corn | Grits, polenta, decoration | Low | Mostly hard | Multicolor |
| Sweet Corn | Fresh eating | High | Low starch, high sugar | Yellow, white, bicolor |
| Popcorn | Snacking | Low | Very hard | Yellow, white |
| Flour Corn | Baking, tortillas | Low | Mostly soft | White, blue, various |
| Pod Corn | Research, novelty | Low | Mixed | Varies |
| Waxy Corn | Thickeners, noodles | Low | Amylopectin-rich | Yellow, white |
How to choose the right types of corn
Whether you’re standing in a grocery store or planning a home garden, here’s a simple decision guide:
- Want to eat it on the cob tonight? Choose sweet corn.
- Making tortillas, tamales, or grits? Choose flint or flour corn (often labeled as “masa corn” or “hominy corn”).
- Craving a movie-night snack? Choose popcorn kernels, not sweet corn kernels — they won’t pop the same way.
- Decorating for autumn? Choose flint corn or multicolor ornamental varieties.
- Growing corn for animal feed or bulk storage? Choose dent corn.
- Looking for a chewy, glossy texture in Asian-style dishes? Choose waxy corn.
A typical mistake made by amateur gardeners is growing sweet corn and field corn too close together. Corn cross-pollinates by wind; thus, growing corn nearby may result in “starchy” or harsh kernels in your sweet corn harvest. If you’re growing many types, space them out or stagger the planting times.
Fun facts about different corn types
- Popcorn is the only type of corn that reliably pops — its unique hull structure and moisture content make the explosive transformation possible.
- Blue corn generally has a lower glycemic index than yellow corn, making it a popular choice in specialty and health-focused food products.
- Glass Gem corn, the rainbow-colored variety, was developed by an Oklahoma farmer named Carl Barnes, who spent decades cross-breeding heirloom corn varieties to preserve Native American seed lines.
- Dent corn is sometimes called “corn belt corn” because it’s the dominant crop across the American Midwest’s Corn Belt region.
- Waxy corn was first discovered in China in the early 1900s and gets its “waxy” nickname from the way the cut kernel’s cross-section looks glossy, like candle wax.
Conclusion:
The next time someone asks you what type of corn they’re eating, you’ll have an accurate answer. From the delicious sweetness of sweet corn to the exploding drama of popcorn, and from the rustic texture of flint corn grits to the industrial backbone of dent corn, each kind has a unique impact on how we eat, produce, and even decorate our homes.
Understanding the types of corn isn’t just useful for chefs and farmers — it makes you a smarter shopper, a better gardener, and honestly, a more interesting person at the dinner table.
Certainly! If you’d like to learn more, please consider following our WhatsApp Channel, Facebook, Instagram, YouTube, Twitter, and Pinterest.
Frequently asked questions about types of corn
Q1: What type of corn is used for popcorn?
A1: Only popcorn kernels can pop properly. They have a hard outer hull and just the right amount of internal moisture to build pressure and explode when heated — sweet corn or dent corn kernels will not pop the same way.
Q2: What’s the difference between sweet corn and field corn?
A2: Sweet corn is harvested young, while sugar levels are high and before starch fully develops, making it tender and sweet for fresh eating. Field corn (dent corn) is left to mature and dry fully on the stalk and is used for feed, industrial processing, and cornmeal — not for eating fresh.
Q3: What type of corn is best for making tortillas?
A3: Flint corn and flour corn are the traditional choices for tortillas, especially when nixtamalized to make masa. White and blue corn varieties are particularly popular for this purpose in Mexican cuisine.
Q4: What are the main types of corn?
A4: The seven primary types are dent corn, flint corn, sweet corn, popcorn, flour corn, pod corn, and waxy corn. They’re classified based on kernel structure, starch composition, and sugar content.