")
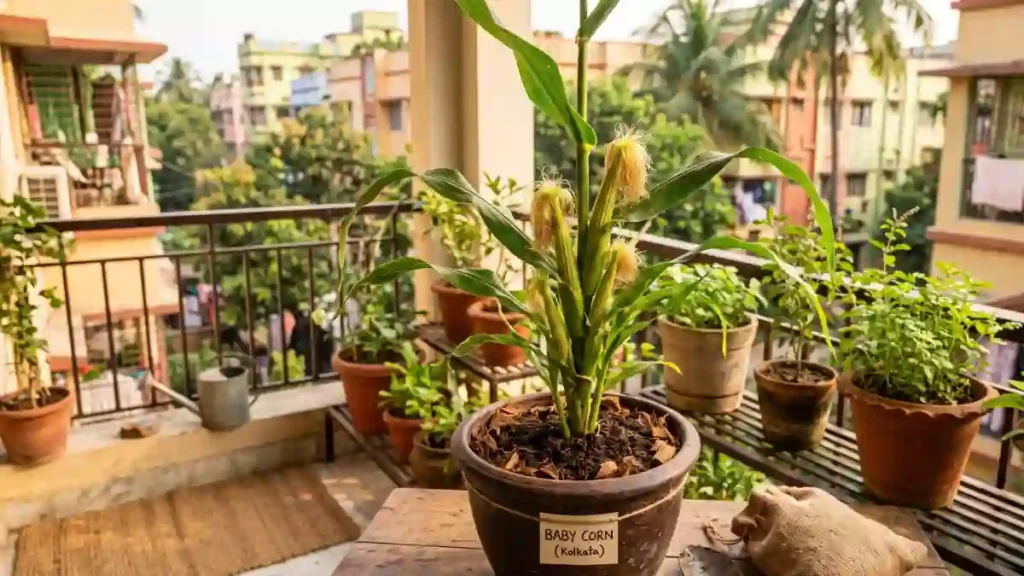
Imagine pulling a crisp head of lettuce or a vine-ripened tomato from your own kitchen counter, grown without a single speck of soil, pesticide, or muddy backyard. That’s the promise of hydroponic vegetables — a farming method that is quietly transforming home gardens, urban farms, and commercial greenhouses around the world.
Hydroponics is the method of growing plants in nutrient-rich water solutions rather than traditional soil. Hydroponic gardening, which provide water, oxygen, and minerals directly to plant roots, allow crops to grow quicker, healthier, and with substantially less waste than conventional farming.
This tutorial will teach you everything you need to know about hydroponic vegetables, how they grow, which crops flourish best, the benefits and drawbacks of various systems, and how to start growing your own – even in a small flat.
What are hydroponic vegetables?
Hydroponic vegetables are plants cultivated in a soil-free environment where roots are suspended in, or periodically exposed to, a water-based nutrient solution. Instead of extracting nutrients from soil, the plant absorbs a precisely balanced mix of minerals like nitrogen, phosphorus, potassium, calcium, and magnesium dissolved directly in water.
This process is not new; it dates back centuries to ancient civilisations’ floating gardens — but current technology has transformed hydroponics into one of the most efficient agricultural practices accessible today.
How hydroponic systems work
At its core, a hydroponic system needs four things:
- A growing medium (such as coconut coir, rockwool, clay pebbles, or perlite) to anchor roots
- A nutrient reservoir containing water mixed with essential minerals
- A delivery mechanism to circulate nutrients to the roots (pumps, wicks, or drip lines)
- A light source, either natural sunlight or grow lights, to power photosynthesis
Because the plant doesn’t need to search through soil for nutrients, it can redirect that saved energy into faster growth and higher yields.
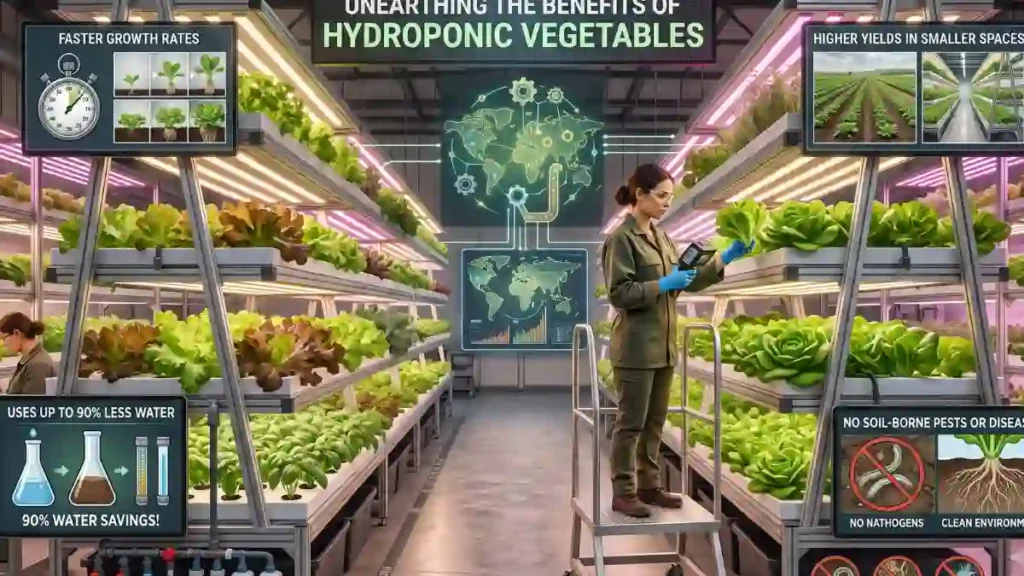
Why grow hydroponic vegetables? key benefits
1. Faster growth rates
Hydroponic vegetables typically grow 30-50% faster than their soil-grown counterparts. Because nutrients are readily available at the root zone, plants expend less energy foraging and more on producing leaves, stems, and fruit.
2. Higher yields in smaller spaces
Vertical hydroponic towers and stacked systems allow producers to produce substantially more food per square foot than traditional row farming, making hydroponics perfect for urban areas and small backyards.
3. Uses up to 90% less water
Because water is recirculated within a closed-loop system rather than absorbed into surrounding soil and lost to runoff, hydroponics is remarkably water-efficient — a critical advantage in drought-prone regions.
4. No soil-borne pests or diseases
Without soil, many common pests, fungi, and weeds simply have nowhere to live. This drastically reduces (and often eliminates) the need for chemical pesticides and herbicides.
5. Year-round growing, regardless of season
Indoor hydroponic setups paired with grow lights allow continuous harvests through winter, monsoon, or drought — completely independent of outdoor climate conditions.
6. Cleaner, more consistent produce
Because hydroponic vegetables grow above ground in controlled environment, there is no soil residue, which reduces contamination risk and the need for frequent washing.
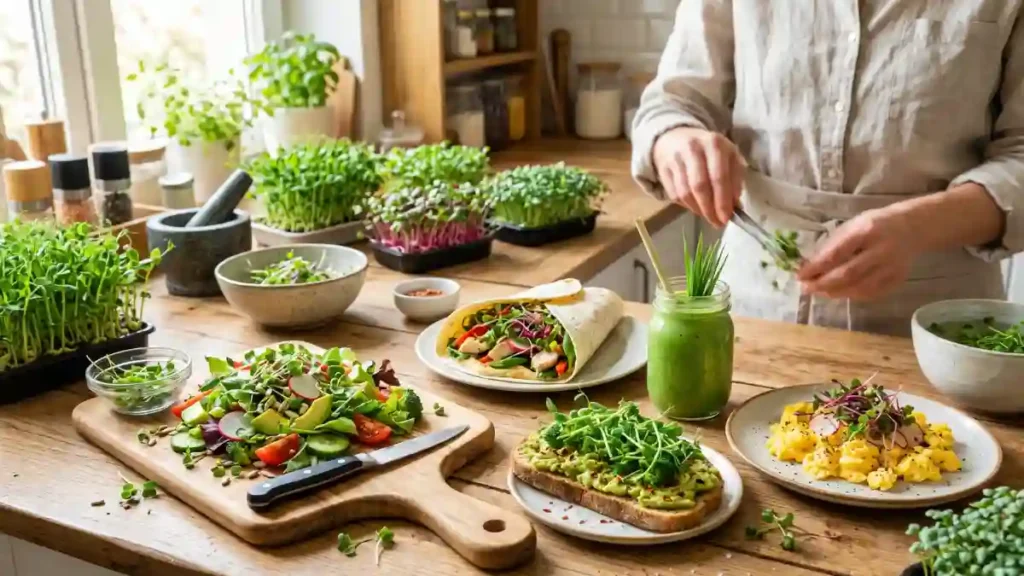
Best vegetables to grow hydroponically
Not every vegetable performs equally well in a hydroponic environment. Here are the top-performing crops for beginners and experts alike.
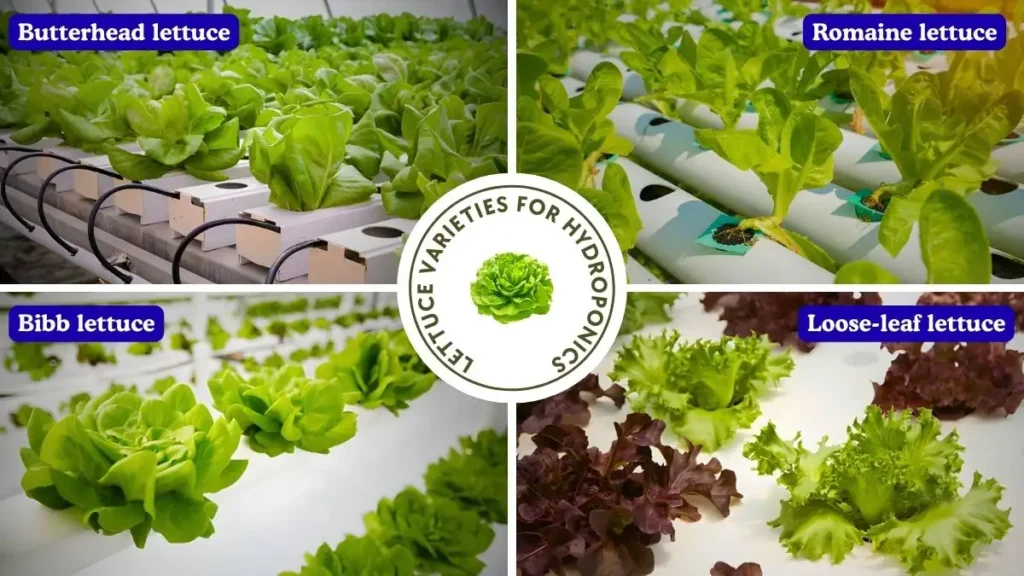
Leafy greens (Best for beginners)
Lettuce, spinach, kale, and arugula are the easiest hydroponic vegetables to grow. They have shallow root systems, grow quickly, and tolerate minor nutrient fluctuations well.
Herbs
Basil, mint, cilantro, and parsley thrive in hydroponic systems and are popular among home gardeners due to their small size and quick regeneration after harvest.
Tomatoes
Tomatoes are one of the most satisfying hydroponic vegetables (actually a fruit) to produce, but they demand strong support structures, greater light, and frequent pH monitoring.
Peppers and chilies
Bell peppers and chili peppers adapt well to hydroponics, particularly in drip or Dutch bucket systems, and often produce more vibrant, flavorful fruit.
Cucumbers
Cucumbers grow quickly and prolifically in vertical hydroponic towers, making the best use of limited space.
Root vegetables (More advanced)
Radishes and carrots can be produced hydroponically, although they require a deeper growing media and more precise care than leafy greens.

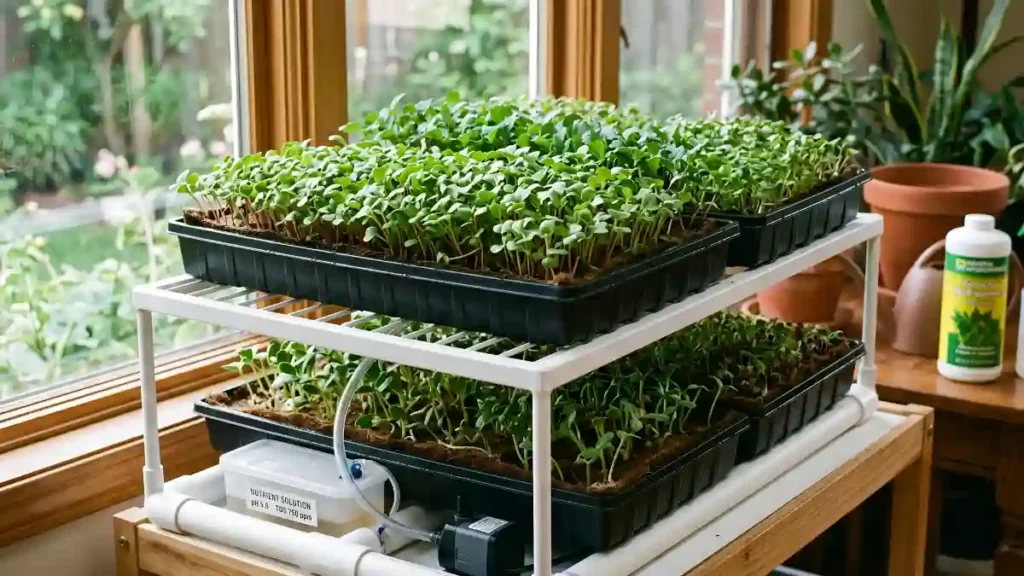
Types of hydroponic systems explained
Choosing the right system depends on your budget, space, and experience level.
Deep water culture (DWC)
Plant roots hang directly in an oxygenated nutrition solution. DWC is simple, inexpensive, and great for novices cultivating leafy greens and herbs.
Nutrient film technique (NFT)
A thin coating of fertiliser solution runs constantly over plant roots via slanted channels. NFT is space-efficient and widely used in commercial vertical farms.
Drip systems
Nutrient solution is dripped slowly at the base of each plant. Highly customizable, drip systems work well for larger vegetables like tomatoes and peppers.
Ebb and flow (Flood and drain)
The growth tray periodically floods with nourishing solution, which drains back into the reservoir. This adaptable method works with a wide variety of vegetables.
Aeroponics
Roots are hung in air and misted with nutritional solution on a regular basis. Aeroponics provides the fastest growth rates but necessitates greater technical precision.
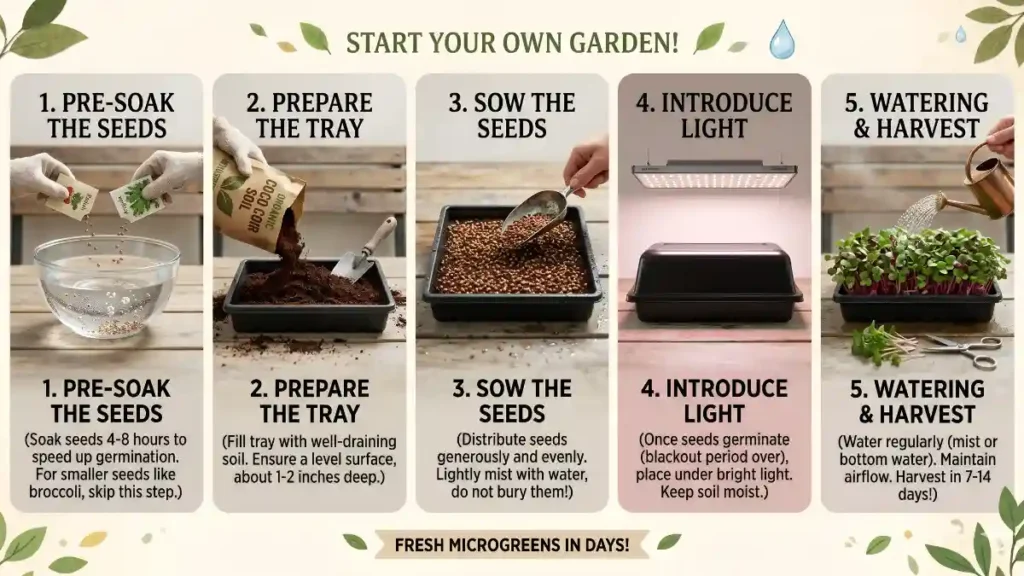
How to start growing hydroponic vegetables at home
Step 1 — Choose your system
Beginners should start with a small Deep Water Culture or kit-based system before scaling up to more complex setups.
Step 2 — Select your vegetables
Start with fast, forgiving crops like lettuce, spinach, or basil to build confidence before attempting fruiting vegetables like tomatoes.
Step 3 — Set up lighting
If growing indoors, invest in full-spectrum LED grow lights positioned 12–24 inches above plants, running 12–16 hours daily.
Step 4 — Mix your nutrient solution
Use a hydroponic-specific nutrient formula and maintain the solution’s pH between 5.5 and 6.5 for optimal nutrient absorption.
Step 5 — Monitor water and nutrient levels
Check pH and electrical conductivity (EC) levels every 2–3 days, topping off water as it’s absorbed or evaporates.
Step 6 — Harvest and maintain
Harvest leafy greens within 4–6 weeks and continuously clean your system between grow cycles to prevent algae or bacterial buildup.
Common mistakes to avoid with hydroponic vegetables
- Ignoring pH balance — Even minor pH swings can block nutrient absorption entirely
- Overcrowding plants — Poor airflow increases the risk of mold and disease
- Using tap water without treatment — Chlorine and heavy minerals can disrupt nutrient uptake
- Inconsistent lighting schedules — Irregular light cycles stress plants and reduce yield
- Neglecting reservoir cleaning — Stagnant, dirty water breeds harmful bacteria and algae
Hydroponic vs. soil-grown vegetables: Which is better?
| Factor | Hydroponic Vegetables | Soil-Grown Vegetables |
| Growth Speed | Flavor (some crops) | Standard |
| Water Usage | Up to 90% less | Higher |
| Space Efficiency | High (vertical options) | Lower |
| Pest/Disease Risk | Lower | Higher |
| Initial Setup Cost | Higher | Lower |
| Nutrient Control | Precise | Variable |
| Flavor (some crops) | Comparable, occasionally milder | Often richer, especially tomatoes |
Ultimately, hydroponic vegetables offer superior efficiency and control, while soil-grown produce still holds an edge in flavor complexity for certain crops due to natural microbial interactions.
Is hydroponic farming sustainable and eco-friendly?
Yes, hydroponic vegetable gardening is widely recognised as one of the most sustainable agricultural practices available today. Its closed-loop water systems significantly reduce consumption, its vertical design maximises land-use efficiency, and the reduction in pesticide dependency improves both ecosystems and human health. However, the energy consumption of artificial grow lights (in entirely indoor setups) remains a concern, which is why many commercial operations combine hydroponics with solar power or greenhouse sunlight to reduce electricity expenses.
Conclusion: Is growing hydroponic vegetables worth it?
Hydroponic vegetables are a smarter, faster, and more resource-conscious method to raise fresh produce – whether you’re an urban dweller with limited space, a home gardener wanting year-round harvests, or a commercial producer looking for higher yields with less water waste. While the initial setup necessitates some investment and understanding, the long-term benefits — in flavour, efficiency, and sustainability — make hydroponics one among the most exciting changes in modern agriculture.
Start small, with tolerant crops like lettuce or basil, and expand as your confidence (and harvest) improves.
Certainly! If you’d like to learn more, please consider following our WhatsApp Channel, Facebook, Instagram, YouTube, Twitter, and Pinterest.
Frequently asked questions about hydroponic vegetables
Q1: How long do hydroponic vegetables take to grow?
A1: It depends on the crop. Leafy greens like lettuce and spinach are typically ready in 4–6 weeks, while fruiting vegetables like tomatoes and peppers may take 8–12 weeks to first harvest.
Q2: Is hydroponics expensive to start at home?
A2: Beginner kits can start as low as a modest one-time investment, while larger vertical or automated systems cost more upfront. However, reduced water usage and higher yields often offset costs over time.
Q3: Can I grow hydroponic vegetables without electricity?
A3: If you’re using natural sunlight near a window or in a greenhouse, you can avoid grow lights. However, most indoor systems rely on electric pumps and lighting for consistent results.
Q4: Are hydroponic vegetables as nutritious as soil-grown vegetables?
A4: Yes, in most cases. Studies show hydroponic vegetables can match or even exceed the nutrient density of soil-grown produce, since growers can precisely control mineral availability rather than relying on unpredictable soil quality.


")


")


")